Configuring Pan/Tilt Limits (Horizon)
Configuring pan/tilt limits allows you to limit the pan and tilt range of the camera. This is useful for limiting the camera's observable area. For example, in a live broadcast stage play, it may be useful to limit the camera's pan range to the left and right ends of the stage, and limit the camera's tilt range to the highest and lowest parts of the stage. This prevents the camera from being accidentally turned around to face the audience, and generally limits the camera to show only what's intended to be shown.
Horizon requires the latest production firmware. Check your camera's software for updates and enable it. If you'd rather not update firmware right now, you can still set Pan/Tilt Limits using CMP, the Desktop Control App, or Packet Sender.
Setting Pan/Tilt Limits
-
Open a web browser and enter the camera's IP address followed by "/horizon". E.g.
http://192.168.100.236/horizon -
Log in to your camera.
-
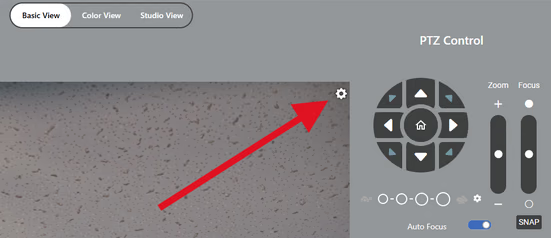
Click the Cog icon in the top-right corner of the camera's video feed.
 tip
tipWe recommend enabling the crosshair overlay before starting the wizard. The crosshair can make it easier to accurately position your Pan/Tilt Limits.
-
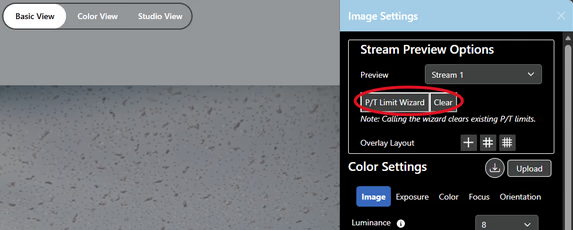
Click the P/T Limit Wizard button to begin the process.
-
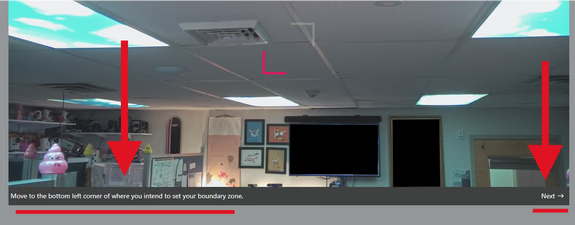
A lower-left bracket icon will appear in the camera's video feed. This represents your left-most and lower Pan/Tilt Limit.
- Point and drag your cursor to move the lower-left bracket icon to the location you intend as your lower-left boundary.
- Once satisfied, click the Next button in the bottom-right corner.
-
An upper-right bracket icon will now appear. This represents your right-most and upper Pan/Tilt Limit.
- Move the camera to the upper-right area you intend as your boundary, then click Next.
- Move the camera to the upper-right area you intend as your boundary, then click Next.
-
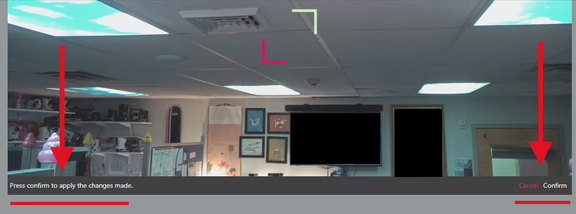
Click Confirm to enable the Pan/Tilt Limit you just defined.
-
Your Pan/Tilt Limit is now active. The camera will be prevented from moving outside the defined area.
-
You can modify the Pan/Tilt Limit at any time by repeating these steps — starting the wizard again will clear any currently set limits.
Clearing Pan/Tilt Limits
- Follow steps 1–3 above to open the settings cog on the Basic View of the Horizon interface.
- Click the Clear button on this page to remove and disable Pan/Tilt Limits.
Clearing Pan/Tilt Limits Using the IR Remote (Move SE Only)
- Aim the remote at the camera and press the "P/T RST" button to clear the camera's pan/tilt limits. The camera will pan/tilt to recalibrate when the command is received.
Note: This command will not work on the Move 4K or Link 4K. The camera will move through its calibration motion, but the limits will not clear. Use the On-Screen Display Menu or, on Move 4K/Link 4K, the Clear button in Horizon's P/T Limit Wizard instead.
Other Ways to Manage Pan/Tilt Limits
Pan/tilt limits can also be set or cleared using a few legacy and advanced tools:
- Setting Pan/Tilt Limits via CMP
- Setting Pan/Tilt Limits via the Desktop Control App (Legacy)
- Setting & Clearing Pan/Tilt Limits with Packet Sender (Advanced)
Pan/Tilt Limits and Target Loss
If you're using auto-tracking or auto-framing, Pan/Tilt Limits also constrain where the camera can move when it recovers from losing its tracked subject — the camera will never move outside your configured limits, even when returning to a Target Loss preset. See Configuring Target Loss to learn how the two features interact.