How to Reset the Admin Password on a Camera
This guide will explain how to reset the admin password on a PTZOptics camera.
G2 Password Reset Methods & Notes
- PT20X-SDI-XX-G2
- PT12X-USB-XX-G2
- PT12X-NDI-XX
- PT-STUDIOPRO
Note: “XX” stands for the color. Use “WH” for white and “GY” for gray.
The default credentials for G2 cameras are username admin, password admin.
Method A: IR Remote Command (Recommended)
Before attempting to issue the IR remote command, make sure the correct IR channel (indicated by the CAMERA SELECT button) is selected and the camera is responding. You can test this by using the arrow buttons on the remote. The camera should respond to movement commands and the green standby light on the front should flash.
While aiming the remote at the camera, press the buttons *, #, MANUAL one at a time, and the camera should reboot. You can confirm the admin password has been reset by typing the camera's IP address into your browser's address bar and logging in with the default credentials of admin/admin.
On the latest firmware, the *, #, MANUAL command will reset the admin password and the camera's IP information. Depending on your network, the camera may default back to DHCP and get an IP address from your router, or it will revert to its fallback IP address of 192.168.100.88.
To display the camera's IP address on-screen, use the IR Remote command: Press *, then #, then 4. The IP address also briefly appears on-screen after the camera has been rebooted. You can use the IR remote command #, then *, then 4 to set the camera's network mode to DHCP.
For the full list of IR remote shortcuts, see IR Remote Control Shortcuts.
Method B: Upgrade Tool v2.9.79 (Advanced)
The latest version of the Upgrade Tool for Windows adds an admin password reset function to the Network Reset button in the Config tab seen below. This application can be downloaded from the Downloads page page.
If you are unable to use this version of the Upgrade Tool and you don't have the IR remote that comes with the camera, please email [email protected]!
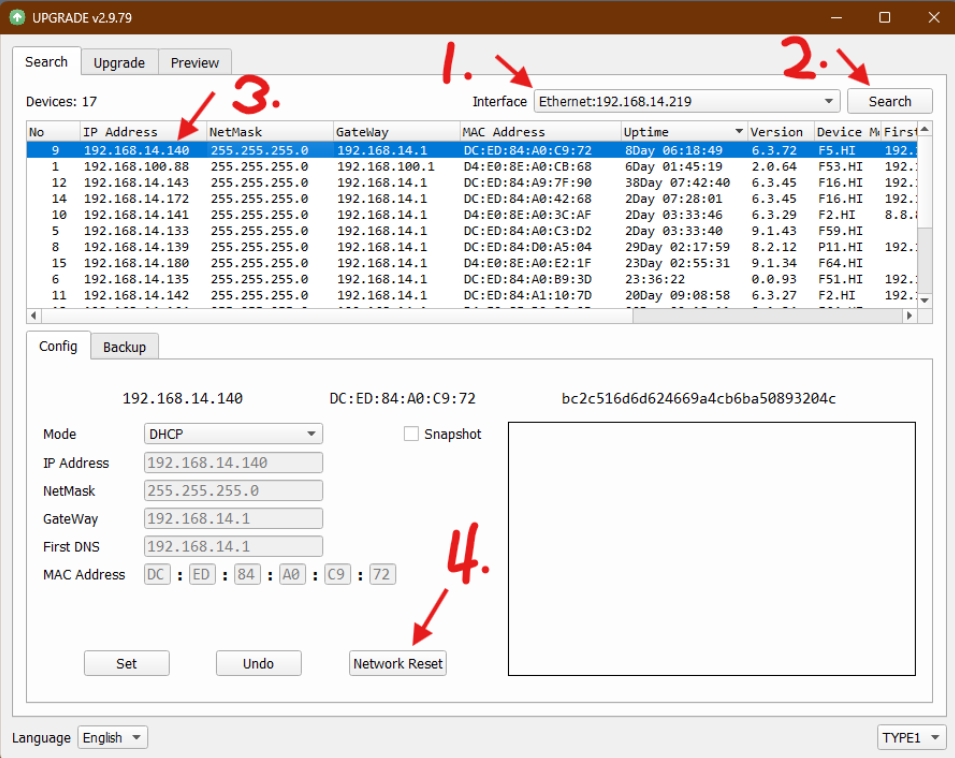
- Select your network interface from the dropdown menu.
- Click
Search. - Select your camera from the list. It's network connection details will populate the fields in the
Configtab. - Click the
Network Resetbutton. This will reset the camera's IP information and reset the admin password.
Wait a minute or two for the camera to reboot, then click the Search button again. Depending on your network, the camera may default back to DHCP and get an IP address from your router, or it will revert to its fallback IP address of 192.168.100.88. If it's using the fallback address, you won't be able to access the web interface of the camera. Select the camera from the Devices list again, change the Mode dropdown to DHCP and click Set. The camera should reboot again and appear with a valid IP address from your router.
If you're unable to find the camera on your network using the Upgrade Tool, please email [email protected]!