Producer Kit 4K Setup Guide
This guide walks you through setting up a PTZOptics Producer Kit 4K from the box to a fully controllable three-camera system. It covers both of the ways the kit is commonly deployed: on a normal network using DHCP, and on a closed network with static IP addresses and no internet connection.
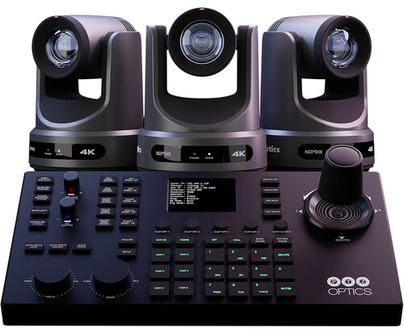
What's in the Kit
- (3) MOVE 4K 20X cameras
- (1) PT-SUPERJOY-G1 controller
What Else You'll Need
You supply the network hardware, cabling, and a computer:
- A PoE+ network switch with enough power budget for all four devices
- Ethernet cables for each camera, the joystick, and your computer
- A computer on the same network, preferably on a wired connection
Each MOVE 4K camera draws up to about 18 W, and the SuperJoy draws up to about 15 W. For all four devices, look for a switch with at least a 69 W total PoE budget. The switch should support PoE+ and provide 1 Gigabit of speed per port.
A single Ethernet cable provides power, control, and video for each camera, so once the switch is in place you are only running one cable per device.
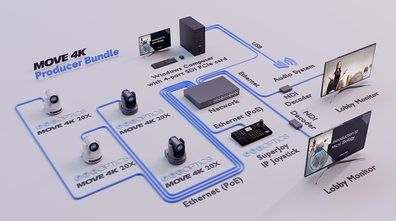
Choose Your Setup Method
Pick the tab that matches your situation:
- DHCP is the default for all PTZOptics devices. Use it when you have a router on site and the cameras can pull addresses automatically. This is the easier path.
- Closed Network uses static IP addresses with no router, modem, or internet connection. Use it for a self-contained production system.
- DHCP (Default)
- Closed Network (Static IP)
Step 1: Connect the Hardware
Connect everything in this order, giving each device time to boot:
- Plug the network switch into power.
- Connect your router to the switch with an Ethernet cable, and let it boot up.
- Connect the PT-SUPERJOY-G1 to the switch with an Ethernet cable.
- Connect each camera to the switch, one at a time.
- Connect your computer to the switch, or directly to the router.
A wired Ethernet connection is recommended for the computer, but Wi-Fi works as long as the switch is connected to the router. Once the switch is connected, the router's Wi-Fi network can reach the cameras too.
Step 2: Confirm the SuperJoy Has an IP Address
With everything powered on, the SuperJoy should display a Local IP at the top of its LCD screen. Write this address down — you will need it in the next step.
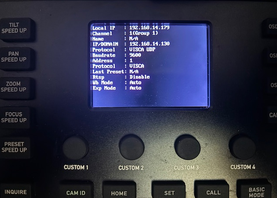
If you see a Configuration Failed message instead, the joystick did not receive a DHCP address. Switch it back to DHCP:
- Press the SETUP button.
- Scroll down to the Network selection.
- Push the joystick left or right until it reads DHCP.
- Press ENTER twice to reboot the joystick in DHCP mode.
If it still does not get a Local IP after rebooting, see Configuration Failed for more troubleshooting steps, or give us a call.
Step 3: Log In to the SuperJoy Web Interface
Type the SuperJoy's Local IP address into a browser on your computer.
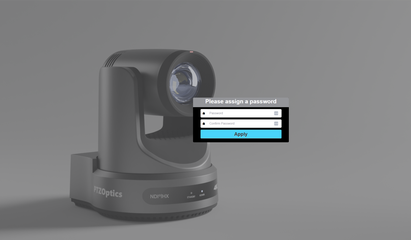
You should be prompted to set a new password. The password can be up to 16 characters
with no banned characters. After setting it, log in with admin as the username and your new
password.
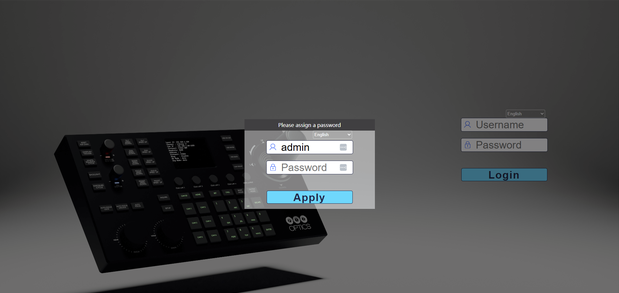
If you are not prompted to set a password, the SuperJoy is on older firmware — log in with
admin as the username and leave the password blank.
If the web interface will not load at all, there is likely a problem with the network connection, the cabling, or the IP address. Confirm each of those, and if the page still will not open, contact support.
Step 4: Find and Add Your Cameras
- In the SuperJoy web interface, go to the Search tab in the upper left.
- Run a PTZOptics search. Each of your cameras should appear in the list.
- Write down the IP address of each camera — you will need them later to adjust camera settings.
- Highlight a camera and click Add.
- Enter a Channel and a Cam Name, then save.
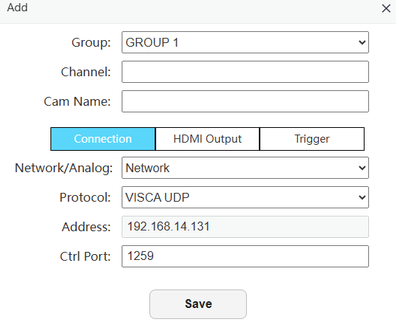
The channel is the camera number on the joystick: channel 1 is the CAM1 button, channel 2
is CAM2, and so on. The name can be anything, but using CAM1, CAM2, and CAM3 keeps
things easy to track.
Repeat for all three cameras. You should now be able to press CAM1 through CAM3 on the joystick and control each camera.
This method uses static IP addresses on a self-contained network. You will not connect a router, modem, or anything else that links the hardware to the internet.
Step 1: Connect the SuperJoy and Computer
Leave the cameras unplugged for now — you will add them one at a time in Step 4.
- Plug the network switch into power.
- Connect the PT-SUPERJOY-G1 to the switch with an Ethernet cable.
- Connect your computer to the switch. A wired Ethernet connection is required here, since there is no router providing Wi-Fi.
Step 2: Set a Static IP on the SuperJoy
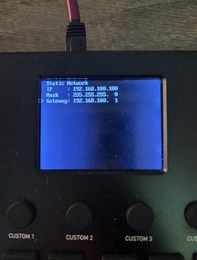
With no DHCP server on the network, the SuperJoy will display a Configuration Failed message. That is expected. Assign it a static address:
-
Press the SETUP button.
-
Scroll down to Network: DHCP.
-
Push the joystick left or right to change it to Static, then press ENTER.
-
Enter the following settings when prompted:
- IP:
192.168.100.100 - Mask:
255.255.255.0 - Gateway:
192.168.100.1
- IP:
-
Press ENTER, then press ENTER again when prompted to reboot.
Once the joystick comes back up, the LCD should show 192.168.100.100 as the Local IP.
Step 3: Set a Static IP on Your Computer
Your computer needs an address on the same subnet to talk to the joystick and, later, the cameras. Use these settings:
- IP:
192.168.100.110 - Subnet:
255.255.255.0 - Gateway/Router:
192.168.100.1 - DNS:
192.168.100.1
If you need help changing this setting on your computer:
- Windows: How to configure a static IP on Windows 10 or 11
- macOS: Set a static IP in macOS Ventura and later
Once your computer's IP is set, you should be able to type 192.168.100.100 into a browser
and reach the SuperJoy web interface.
Step 4: Assign Camera IP and IR Addresses
Now add the cameras to the switch and give each one its own IP and IR address. You will do this with the IR remote, so have it handy.
Work through the cameras one at a time, starting with camera 3. For each camera: plug it into the switch, wait for it to finish booting, issue the IR address command, wait for it to reboot and for the green standby light to go off, then press the matching camera select button and issue the IP address command.
Camera 3
Change IR address - [*] > [#] > [F3]       Sets IR address 3
Change IP address - [#] > [*] > [#] > [3]  Sets IP address to 192.168.100.83
Camera 2
Change IR address - [*] > [#] > [F2]       Sets IR address 2
Change IP address - [#] > [*] > [#] > [2]  Sets IP address to 192.168.100.82
Camera 1
Change IR address - [*] > [#] > [F1]       Sets IR address 1
Change IP address - [#] > [*] > [#] > [1]  Sets IP address to 192.168.100.81
Step 5: Log In to the SuperJoy and Add the Cameras
Type 192.168.100.100 into a browser on your computer. You should be prompted to set a new
password, which can be up to 16 characters with no banned characters. After setting it,
log in with admin as the username and your new password.
If you are not prompted to set a password, the SuperJoy is on older firmware — log in with
admin as the username and leave the password blank.
Now add each camera by its static IP address:
- Click modify for channel 1 and enter
192.168.100.81. - Click modify for channel 2 and enter
192.168.100.82. - Click modify for channel 3 and enter
192.168.100.83.
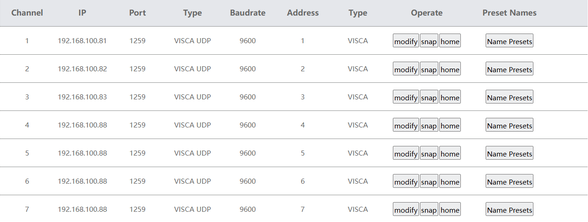
You should now be able to press CAM1 through CAM3 on the joystick and control each camera.
The remaining steps are the same regardless of which method you used.
Get the HDMI Output Working
With the cameras added, select a camera to gain control, then press the HDMI output button on the joystick to make sure the output is turned on.
The most common problem here is a resolution mismatch. The SuperJoy's HDMI output tops out at 1080p60, but MOVE 4K cameras ship set to 4K30, which the SuperJoy cannot display. Point the joystick at the camera's second stream instead:
- Log in to the SuperJoy web interface.
- Click modify for a camera you have added.
- Go to the HDMI Output tab.
- Change the RTSP URL to
rtsp://<CAMERA-IP>:554/2. - Save, and repeat for each camera.
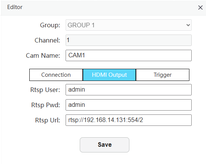
The only change is the last digit, from 1 to 2. This switches the SuperJoy from Stream 1 to
Stream 2, which is lower resolution with better latency. Your full 4K IP feed stays available on
the network at its original resolution.
Set Up the Auto-Tracking Toggle Button
Next, program a button so you can turn auto-tracking on and off from the SuperJoy for whichever camera is currently selected.
-
In the SuperJoy web interface, go to the Custom tab at the top.
-
Select Custom 1, and choose HTTP Trigger from the dropdown.
-
Check the Enable Toggle checkbox. First Press and Second Press fields appear.
-
Enter the following command under First Press, then click the + button to the right of the command line:
http://{{CURRENT_CAM}}/cgi-bin/param.cgi?set_overlay&autotracking&on -
Enter the following command under Second Press, then click the + button:
http://{{CURRENT_CAM}}/cgi-bin/param.cgi?set_overlay&autotracking&off -
Click Save at the bottom.
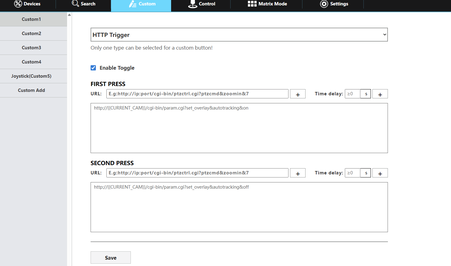
Custom 1 now starts and stops tracking on whichever camera is currently selected.
The most likely cause is that HTTP Authentication is still enabled on your cameras. Turn it off using the steps in the next section, then try the button again.
For more detail on these commands and on custom buttons in general, see Toggle Autotracking on SuperJoy and the Custom Buttons Guide for SuperJoy.
Adjust Your Camera Settings
Take the camera IP addresses you noted earlier and open each one in a browser, one at a time.
You should be prompted to set a new password. Log in with admin as the username and your new
password. If you are not prompted to set a password, the default password is admin.
Set the Image and Color
Once logged in, you can view and control the camera from the Dashboard page. Go to the Image tab under the live image to adjust exposure and color settings.
These settings save with each preset, and presets are stored on the camera — so a preset you save here can be recalled from the SuperJoy. Get each camera looking the way you want before you start saving preset positions.
The web interface preview is a lower-quality feed. For an accurate view of the camera, download NDI Tools and watch the feed in Studio Monitor / Video Monitor, which shows the full high-definition stream.
Turn Off HTTP Authentication
This step is required for full SuperJoy functionality, including the tracking toggle button.
Turning off HTTP Authentication removes the username/password prompt from the camera's HTTP API, so anyone who can reach the camera on the network can control it or change its settings without logging in. Only do this on a trusted, isolated network like the closed network setup described above. If your cameras are reachable from a general office network, the internet, or any network you do not fully control, leave HTTP Authentication on and skip the SuperJoy tracking toggle button instead.
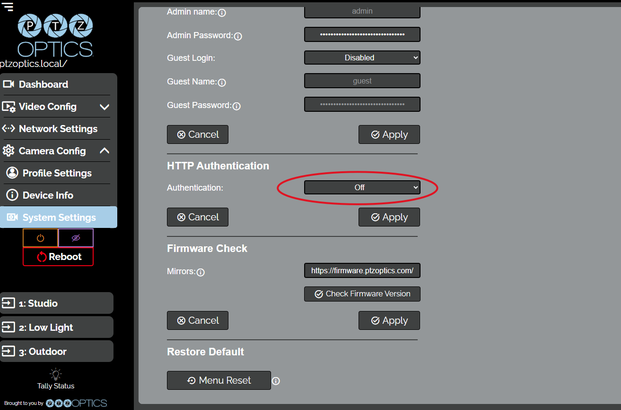
- In the left menu, go to Camera Config → System Settings.
- Scroll down to the HTTP Authentication section.
- Set Authentication to Off.
- Click Apply.
Check for Firmware Updates
Directly below the HTTP Authentication section is Firmware Check. Run it to confirm the camera is up to date. If an update is available, it will prompt you to download the newest file, which you can then upload from the Advanced section below.
Lock In the Camera IP Addresses
You want the IP addresses stored in the joystick to stay valid.
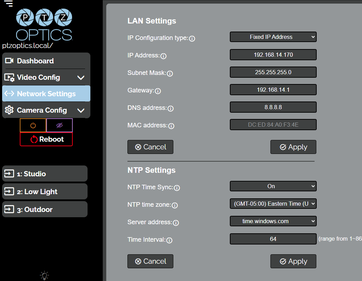
- In the left menu, go to Network Settings.
- Set IP Configuration type to Fixed IP Address.
- Click Apply, then reboot the camera.
If you followed the Closed Network method, your cameras already have static addresses from the IR remote commands and you can skip this step.
Need Help?
If you have any problems with your PTZOptics equipment, or if you get stuck anywhere in this guide, reach out to our Support department.
- Phone: 833-888-9706
- Direct support: 484-593-2584
- Hours: Monday–Thursday 8am–6pm EST, Friday 8am–4pm EST. Closed Saturday and Sunday.
- Community Portal: community.ptzoptics.com
Emailing [email protected] creates a ticket in our system, and we will get back to you as soon as possible.