Using the IR Remote
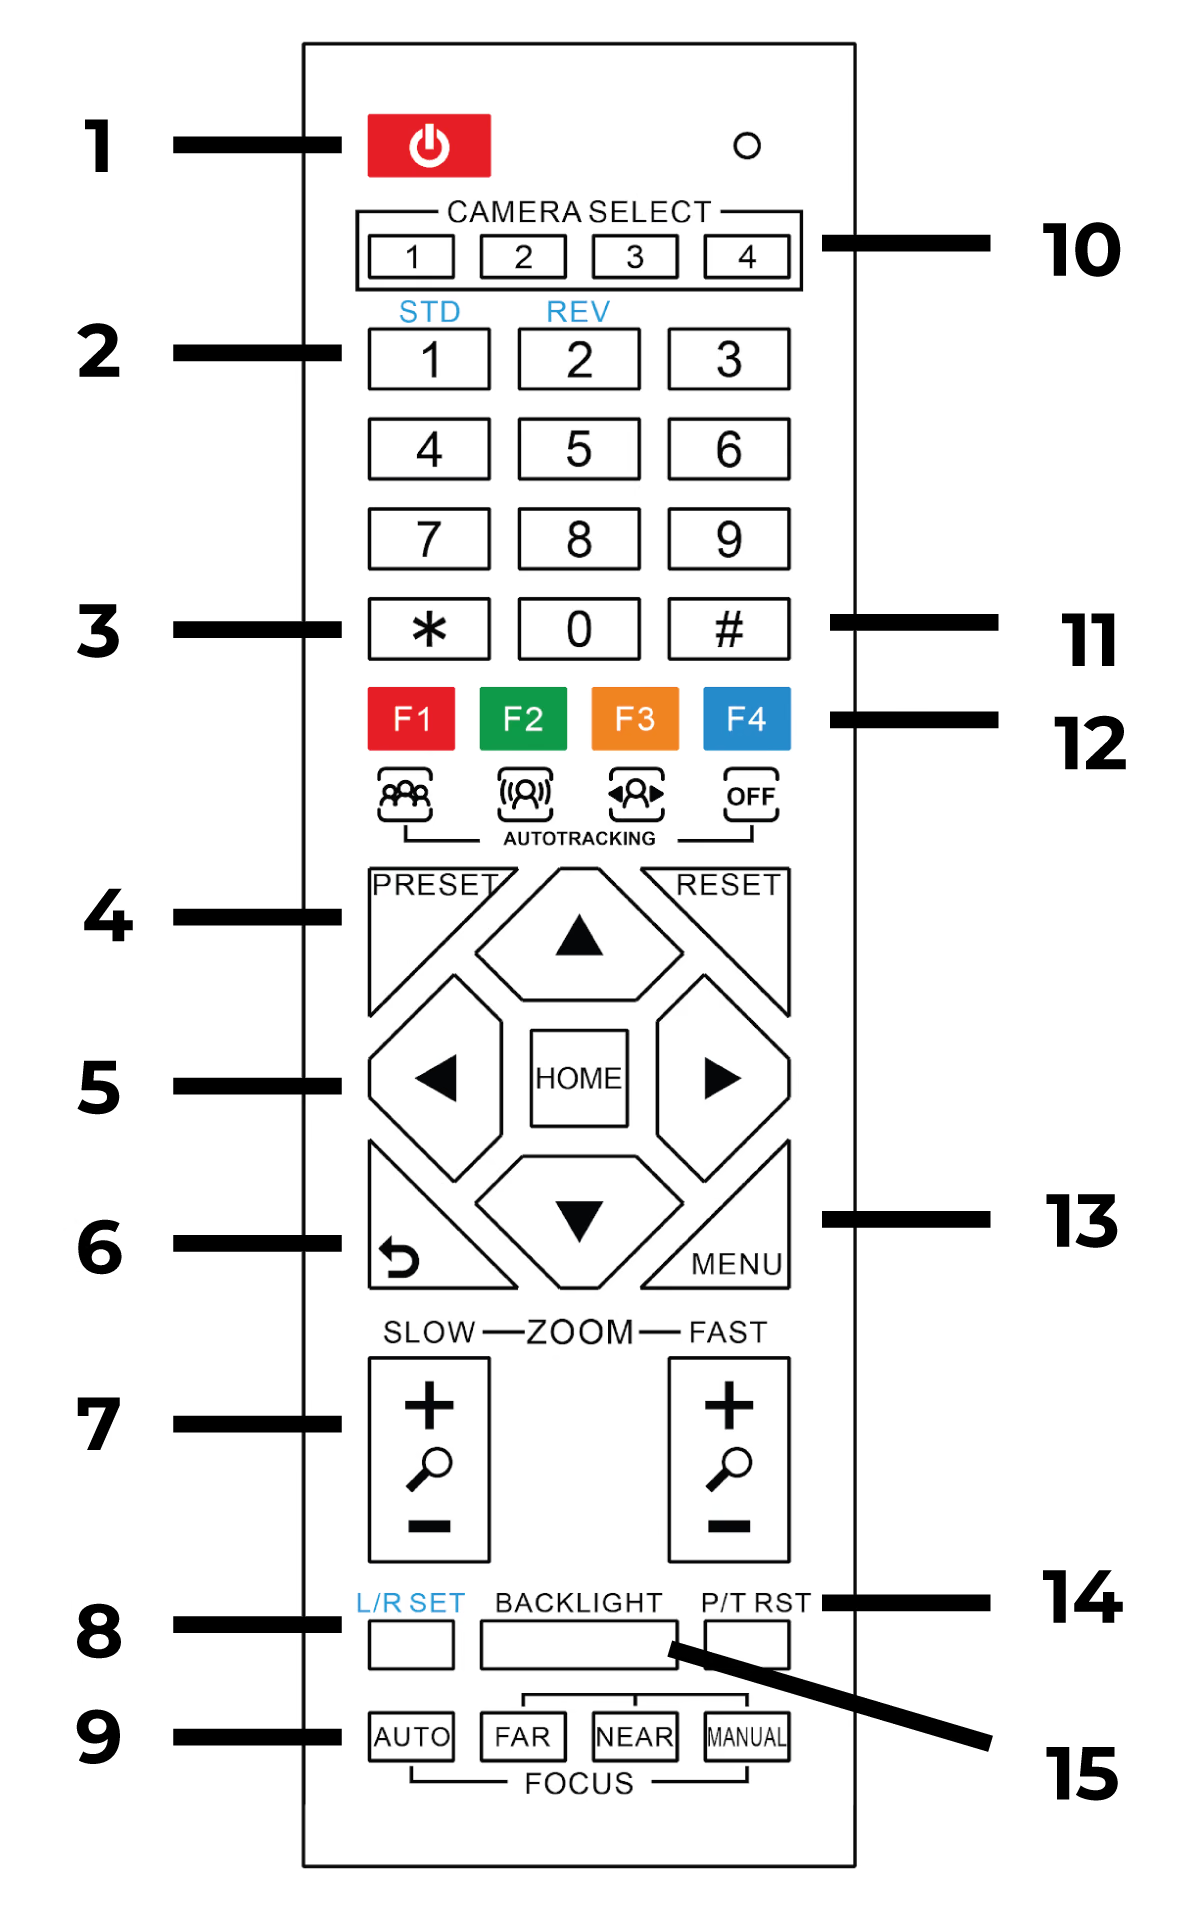
The PTZOptics Studio Pro includes an infrared (IR) remote control for direct camera operation without a computer or network connection. This page organizes the remote's functions by task so you can quickly find what you need, followed by a complete button reference at the bottom.
Point the remote at the camera's front IR sensor. Your camera responds to IR channel 1 by default. If you have multiple cameras in the same room, see Set Up Multiple Cameras below to assign different channels.
Reference
| Button | Label | Function |
|---|---|---|
1 [STANDBY] | Power/Standby | Toggles the camera between active and standby mode. In standby, the camera consumes minimal power but remains responsive to the remote |
2 [1]–[9], [0] | Number Keys | Recall presets (press directly) or enter values for preset save/clear operations |
3 [*] | Star | Command Modifier Key. Used in shortcut commands |
4 [PRESET] | Set Preset | Press before a number key to save the current position as that preset |
4 [RESET] | Clear Preset | Press before a number key to delete that preset. Press twice to clear all presets |
5 [HOME] | Home | Returns the camera to its default home position. The Home Position is not configurable. |
5 [Arrow-Keys] | Pan/Tilt | Pan left/right, tilt up/down |
6 [RETURN] | Return/Back | Used for OSD navigation. Pressing the Return button navigates back to the previous OSD menu |
7 [+] & [-] | Zoom In/Out | Magnifies or widens the image. The slow zoom rocker is on the left side of the remote. The fast zoom rocker is on the right side. |
8 [L/R-SET] | L/R Set | Modify the directional arrows' left/right orientation. Press [L/R-SET] + [1] simultaneously: Buttons function normally. Press [L/R-SET] + [2] simultaneously: Buttons function inverted |
9 [AUTO] | Auto Focus | Enables continuous auto focus |
9 [MANUAL] | Manual Focus | Switches to manual focus mode |
9 [FAR] | Focus Far | Shifts focus to background (manual mode) |
9 [NEAR] | Focus Near | Shifts focus to foreground (manual mode) |
10 [Camera-Select] | Camera Select | Selects which camera (by IR channel) to control |
11 [#] | Pound Sign | Second key in multi-button shortcut sequences |
12 [F1] | Function 1 | Used for shortcuts (Otherwise non-functional) |
12 [F2] | Function 2 | Used for shortcuts (Otherwise non-functional) |
12 [F3] | Function 3 | Enable video-based auto-tracking (non-functional on Studio 4K, Studio SE, or Studio Pro cameras) |
12 [F4] | Function 4 | Disable video-based auto-tracking (non-functional on Studio 4K, Studio SE, or Studio Pro cameras) |
13 [MENU] | Menu | Opens the On-Screen Display (OSD) menu on the video output |
14 [P/T-RST] | Pan/Tilt Reset | Performs a pan/tilt self-calibration cycle |
15 [Backlight] | Backlight | Toggles the camera's backlight compensation On or Off |
Moving the Camera
Pan and Tilt
- Press the arrow keys (up, down, left, right) to pan and tilt the camera.
- The camera moves continuously while you hold a key and stops when you release it.
Zoom In and Out
- Press [Slow Zoom Rocker] (Left-rocker)
[+]or[-]to slowly zoom in or out. - Press [Fast Zoom Rocker] (Right-rocker)
[+]or[-]to quickly zoom in or out.
Return to Home Position
- Press [HOME] to return the camera to the camera's default home position. The Home Position is not configurable.
We recommend setting Preset 0 as your baseline reference, a wide, centered view of the entire scene, so you always have a known starting point to return to.
Reset Pan/Tilt Position
- Press [P/T RST] to perform a pan/tilt self-calibration. The camera moves through its full range of motion and returns to the home position.
The P/T RST function is not available on PTZOptics Studio Cams (Studio 4K, Studio SE, Studio Pro). It works with all PTZ models.
Saving and Recalling Presets
Presets save the camera's position (pan, tilt, zoom) and all image settings at that moment. You can save up to 255 presets.
Save a Preset
- Move the camera to the desired position using the arrow keys and zoom buttons.
- Press [PRESET], then press the number key for the preset you want to save (e.g., [1]).
- The preset is now saved.
Recall a Preset
- Press the number key of the preset you want to recall (e.g., [1]).
- The camera moves to the saved position and restores the saved image settings.
Calling a preset restores both the camera position and all image settings that were active when the preset was saved.
Clear a Single Preset
- Press [RESET], then press the number key of the preset you want to clear (e.g., [3]).
- That preset is deleted.
Clear All Presets
- Press [RESET], then press [RESET] again.
- All saved presets are deleted.
Clearing all presets cannot be undone. Make sure you want to delete every preset before pressing [RESET] twice.
For a more detailed explanation of presets, see Preset Camera Positions.
Focusing the Camera
The remote provides both automatic and manual focus control.
Switching to Auto Focus
- Press [AUTO] to enable auto focus. The camera continuously adjusts focus based on the scene.
Switching to Manual Focus
- Press [MANUAL] to switch to manual focus mode.
Adjusting Focus Manually
- Press [FAR] to shift focus farther away (background).
- Press [NEAR] to shift focus closer (foreground).
In low-contrast scenes (plain backgrounds, low light), switching to manual focus and locking it in gives more stable results than leaving auto focus on.
How to Use Shortcut Commands
The remote supports multi-button shortcut sequences for advanced functions. Press the buttons in order as shown.
Command List
| Shortcut | Sequence | What It Does |
|---|---|---|
| Display IP Address & Network Information | [*] → [#] → [4] | Shows the camera's current IP address, subnet mask, and gateway as an overlay on the video output (HDMI, SDI, or USB) |
| Enable DHCP | [#] → [*] → [4] | Enables DHCP on the camera (may change the camera’s IP address and disconnect active sessions) |
| Fully Reset All Network Settings | [*] → [#] → [MANUAL] | Resets all network settings to factory defaults |
| Display Firmware Version & System Information | [*] → [#] → [8] | Displays the current firmware, ARM, SOC, Model, Firmware Version Date, Current Video Format, Optical Zoom Variant, and the camera's serial number on the video output. |
| Control Speed (Default: Low) | [#] → [*] → [F1] | Sets the IR Remote’s control speed to Low (Not applicable for Studio 4K, Studio SE, or Studio Pro cameras) |
| Control Speed (Medium) | [#] → [*] → [F2] | Sets the IR Remote’s control speed to Medium (Not applicable for Studio 4K, Studio SE, or Studio Pro cameras) |
| Control Speed (High) | [#] → [*] → [F3] | Sets the IR Remote’s control speed to High (Not applicable for Studio 4K, Studio SE, or Studio Pro cameras) |
| Orientation | [*] → [#] → [9] | Quickly set mount mode (flip / normal) |
| OnePush White Balance Trigger | [#] → [*] → [7] | OnePush White Balance Trigger |
| Toggle HDMI / SDI Output | [*] → [*] → [F3] | Toggle between using the camera's HDMI and SDI output |
| Restore Default Settings | [*] → [#] → [6] | Quickly restore the camera's default image settings |
Multi-Function Buttons: Auto-Tracking Controls
| Shortcut | Sequence | What It Does |
|---|---|---|
| No function | [F1] | No function |
| No function | [F2] | No function |
| Enable Auto-Tracking | [F3] | Enable video-based auto-tracking |
| Disable Auto-Tracking | [F4] | Disable video-based auto-tracking |
Auto-tracking shortcuts are not applicable for Studio 4K, Studio SE, or Studio Pro cameras.
Setting the Camera's IP Address
| Shortcut | Sequence | What It Does |
|---|---|---|
| Set IP Address | [#] → [*] → [#] → [1] | Sets the camera's IP address to 192.168.100.81 |
| -- | [#] → [*] → [#] → [2] | Sets the camera's IP address to 192.168.100.82 |
| -- | [#] → [*] → [#] → [3] | Sets the camera's IP address to 192.168.100.83 |
| -- | [#] → [*] → [#] → [4] | Sets the camera's IP address to 192.168.100.84 |
| -- | [#] → [*] → [#] → [5] | Sets the camera's IP address to 192.168.100.85 |
| -- | [#] → [*] → [#] → [6] | Sets the camera's IP address to 192.168.100.86 |
| -- | [#] → [*] → [#] → [7] | Sets the camera's IP address to 192.168.100.87 |
| -- | [#] → [*] → [#] → [8] | Sets the camera's IP address to 192.168.100.88 |
| -- | [#] → [*] → [#] → [9] | Sets the camera's IP address to 192.168.100.89 |
| -- | [#] → [*] → [#] → [0] | Sets the camera's IP address to 192.168.100.80 |
Setting Up Multiple Cameras
When multiple PTZOptics cameras are in the same room, each camera needs a unique IR address so the remote controls only the intended camera.
Assign an IR Address to a Camera
- Point the remote at the camera you want to configure.
- To assign an IR address, press
[*]→[#]→[F1]for Camera 1,[F2]for Camera 2,[F3]for Camera 3, and[F4]for Camera 4. - Press [Camera Select 1], [Camera Select 2], [Camera Select 3] or [Camera Select 4] to cycle through IR channels. The camera responds to the selected channel.
PTZOptics cameras respond to IR channel 1 by default out of the box. You only need to change channels if you have multiple cameras in range of the same remote.
IR Remote Specifications
| Specification | Value |
|---|---|
| IR Channels | 1–4 (default: 1) |
| Battery Type | 2 AAA Batteries |