Color View
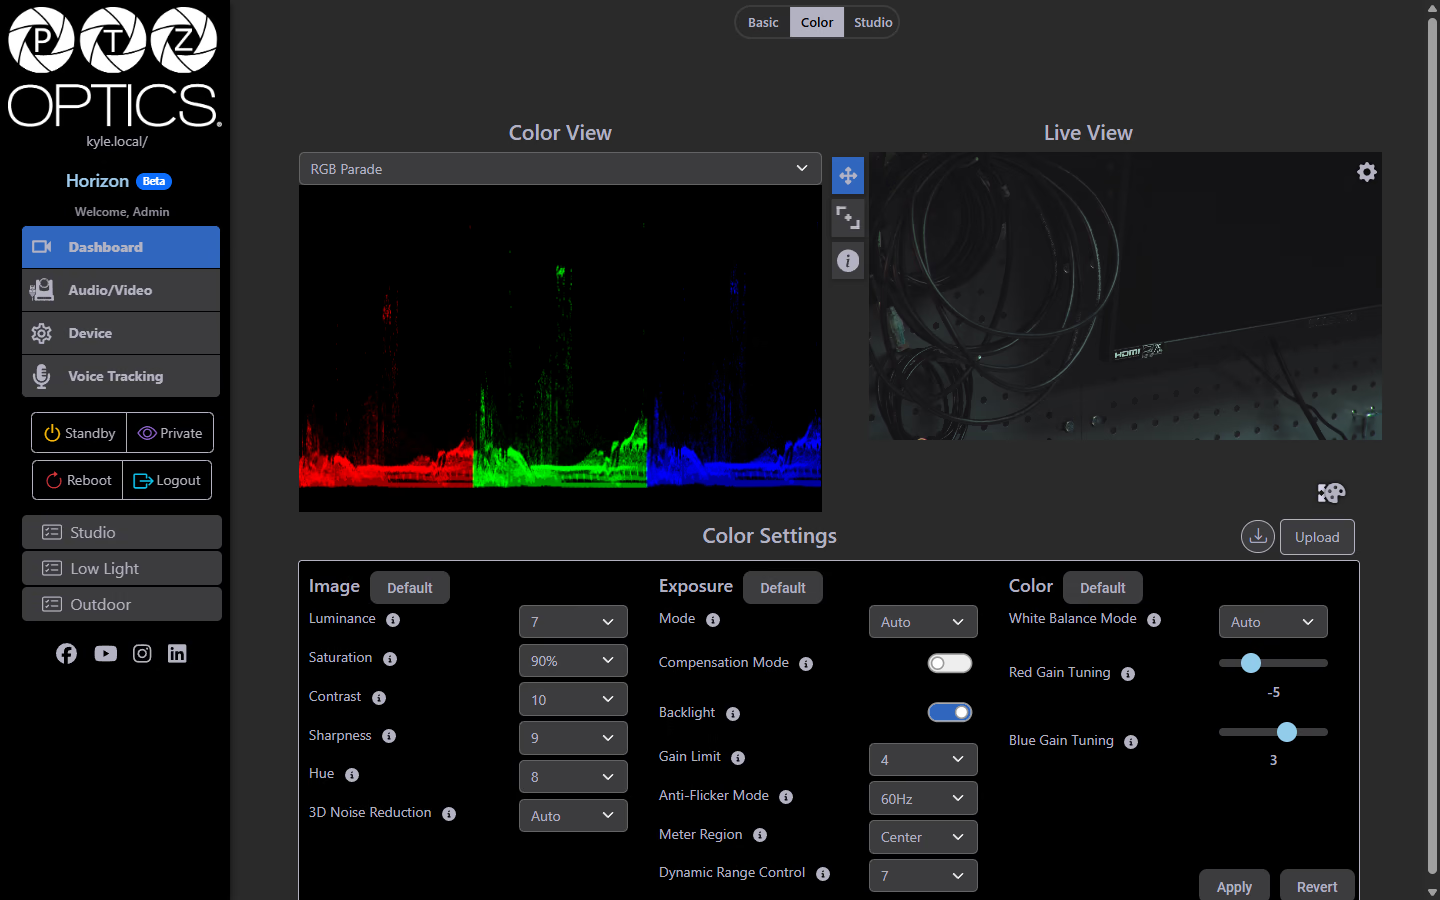
Color View is a professional color analysis and image tuning workspace built directly into the Horizon dashboard. It gives you a real-time video signal analyzer alongside all of the camera's image, exposure, and color controls, so you can make adjustments and immediately see their effect on the signal.
Layout Overview
Color View splits the dashboard into three panels:
- Left: Color analyzer (RGB Parade, Waveform, Vectorscope, or Before Snapshot)
- Right: Live video preview
- Bottom: Color Settings panel with Image, Exposure, and Color sections
Color Analyzer Tool
The analyzer dropdown lets you switch between four industry-standard signal analysis tools:
RGB Parade
The RGB Parade splits the video signal into three separate waveforms; Red, Green, and Blue, displayed side by side. Each channel's waveform shows the brightness/luminance of that color across the horizontal width of the frame.
When to use it:
- Checking color channel balance (are all three channels at similar levels for a neutral scene?)
- Identifying color casts (one channel higher than the others in a scene that should be neutral)
- Verifying clipping in individual color channels
Reading the Parade:
- The Y-axis represents signal level (0 = black, 100 = white/clipped)
- If R, G, and B are roughly level for a neutral grey/white element in frame, white balance is accurate
- If one channel pushes higher than the others, that color is dominating
Waveform
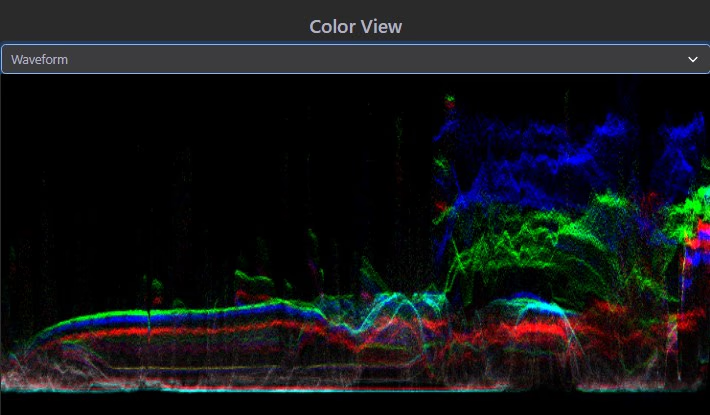
The Waveform monitor displays the luminance (brightness) of the video signal across the full width of the frame. Brighter pixels in the image appear higher on the waveform; darker pixels appear lower.
When to use it:
- Setting exposure level: aim to keep your subject's skin tones in the 40–70% range
- Preventing overexposure: signal should not push above 100% (clipping)
- Ensuring blacks are properly set: signal should touch near 0% for true black but not crush below it
Key reference points:
- 0%: Pure black. Values below this are clipped (crushed blacks)
- 100%: Peak white. Values above this are overexposed (blown highlights)
- 50–70%: Typical range for a well-exposed face or subject
Vectorscope
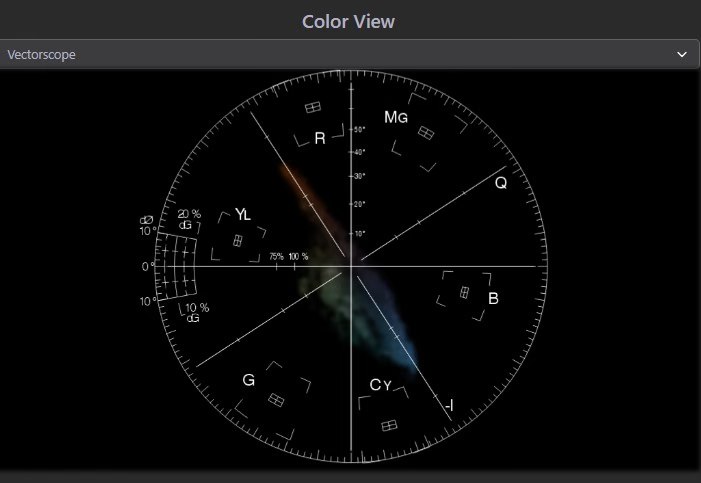
The Vectorscope displays hue and saturation of the video signal as a circular plot. Each color has a known target position on the scope, and the spread of the signal shows how saturated the colors are.
When to use it:
- Verifying accurate color reproduction: e.g., checking that a red object hits the "R" target box
- Diagnosing white balance issues: a neutral grey image should appear as a concentrated dot near the center
- Matching color between multiple cameras: align the vectorscope plots to ensure cameras look the same
Reading the scope:
- Center dot: Neutral/grey, indicates no dominant color (ideal for a white/grey reference card)
- Distance from center: Saturation level; farther out = more saturated
- Direction: Hue; where the trace points corresponds to the dominant color
- Labeled target boxes (R, G, B, Cy, Mg, Yl): These are the standard broadcast target positions for fully saturated primary and secondary colors
Before Settings Snapshot
This option captures the state of the analyzer before you began making changes, so you can compare your adjusted signal against the original. Use it as a reference baseline whenever you start a new round of color corrections.
Color Settings Panel
Image adjustments are grouped into three collapsible sections. Each section has a Default button that resets that entire section to factory values. Individual settings have a small info button that displays an inline tooltip explaining that setting's function.
At the bottom of the panel, you can Save/Download the current settings as a profile or Upload a previously saved profile. The Apply button commits all pending changes; Revert undoes unsaved changes.
Image Settings
Control overall picture quality and appearance.
| Setting | Range | Default | Description |
|---|---|---|---|
| Luminance | 0–14 | 7 | Overall brightness of the image. Increase to brighten, decrease to darken. Works in conjunction with Exposure settings. |
| Saturation | 60–200% | 80% | Color intensity. Higher values make colors more vivid; lower values move toward black-and-white. |
| Contrast | 0–14 | 5 | Difference between the darkest and brightest parts of the image. Higher contrast increases the separation between shadows and highlights. |
| Sharpness | 0–11 | 8 | Edge definition. High values can add artificial crispness but also emphasize noise. Lower for a softer, more cinematic look. |
| Hue | 0–14 | 9 | Shifts the overall color balance around the color wheel. Adjust if colors appear slightly off from reality. |
| 3D Noise Reduction | Off / 1–8 / Auto | 8 | Reduces digital noise (grain), particularly in low-light. Higher values = more aggressive smoothing. Auto lets the camera decide. |
For most professional applications, keep Sharpness at 6–8 and use the Waveform monitor to set Luminance and Contrast so your signal doesn't clip or crush.
Exposure Settings
Control how the camera captures light.
Exposure Mode
| Mode | Description |
|---|---|
| Auto | Camera automatically sets iris, gain, and shutter for a well-exposed image. |
| Manual | Full manual control over all exposure parameters. |
| SAE (Shutter Auto Exposure) | Shutter speed is fixed manually; iris and gain adjust automatically. |
| AAE (Aperture Auto Exposure) | Iris is fixed manually; shutter and gain adjust automatically. |
Additional Exposure Controls
| Setting | Options | Description |
|---|---|---|
| Compensation Mode | Toggle (On/Off) | Enables exposure compensation, allowing you to bias the auto exposure brighter or darker. |
| Backlight | Toggle (On/Off) | Backlight compensation brightens the subject when they're in front of a bright background (e.g., a window). Can cause overexposure of the background. |
| Gain Limit | 0–14 | Sets the maximum gain the auto exposure system is allowed to apply. Lower values reduce noise in low light but may result in underexposure. |
| Anti-Flicker Mode | Off / 50Hz / 60Hz | Synchronizes the camera's shutter to eliminate fluorescent light flicker. Use 60Hz in North America, 50Hz in Europe/Asia. |
| Meter Region | Average / Center / Smart / Top | Defines which part of the frame the auto exposure meter reads from. "Smart" is generally best for dynamic scenes. |
| Dynamic Range Control | 0–8 | Expands the usable range between highlights and shadows. Higher values recover more detail in bright and dark areas simultaneously. |
Anti-Flicker is important in any indoor environment lit by fluorescent or LED lighting on AC power. Without it, you may see a horizontal rolling band or brightness pulsing in the video.
Color / White Balance Settings
Control the color temperature and tint of the image.
White Balance Mode
| Mode | Description |
|---|---|
| Auto | Camera continuously adjusts white balance based on the scene. |
| Indoor | Optimized for warm tungsten/incandescent lighting (~3200K). |
| Outdoor | Optimized for daylight (~5600K). |
| Manual | Set white balance using the Red Gain and Blue Gain sliders. |
| OnePush | Locks white balance based on a single reading. Point the camera at a white card and trigger OnePush to calibrate. |
| VAR | Variable allows you to set a specific color temperature value directly. |
Red Gain Tuning / Blue Gain Tuning
Available in Manual white balance mode. These sliders adjust the relative contribution of the red and blue channels:
- Increase Red Gain to warm the image (more orange/red)
- Decrease Red Gain to cool the image (more blue/green)
- Increase Blue Gain to add blue/cool tones
- Decrease Blue Gain to reduce blue cast
Using OnePush White Balance Place a clean white or neutral grey card in the frame under your key light. Select OnePush from the White Balance Mode dropdown and trigger the calibration. The camera will sample the card and lock to that color temperature. This is the fastest way to achieve accurate, consistent white balance in a controlled lighting environment.
Typical Color Correction Workflow
- Set your lighting. Ensure lights are at their operating temperature before calibrating.
- Open Color View and select the Waveform analyzer.
- Adjust Luminance and Exposure Mode so your key subject sits in the 50–70% waveform range.
- Switch to RGB Parade and adjust White Balance until the three channels are balanced for a neutral reference in frame.
- Switch to Vectorscope to verify color accuracy.
- Use Before Settings Snapshot to compare before and after.
- Adjust Saturation, Contrast, and Sharpness to taste.
- Click Apply, then Save Changes.
- Optionally Download the settings as a named profile for recall later.