Producer Kit 4K Setup — Closed Network
This method uses static IP addresses on a self-contained network. You will not connect a router, modem, or anything else that links the hardware to the internet.
Closed Network Setup Step 1: Connect the SuperJoy and Computer
Leave the cameras unplugged for now — you will add them one at a time in Step 4.
- Plug the network switch into power.
- Connect the PT-SUPERJOY-G1 to the switch with an Ethernet cable.
- Connect your computer to the switch. A wired Ethernet connection is required here, since there is no router providing Wi-Fi.
Closed Network Setup Step 2: Set a Static IP on the SuperJoy
With no DHCP server on the network, the SuperJoy will display a Configuration Failed message. That is expected. Assign it a static address:
-
Press the SETUP button.
-
Scroll down to Network: DHCP.
-
Push the joystick left or right to change it to Static, then press ENTER.
-
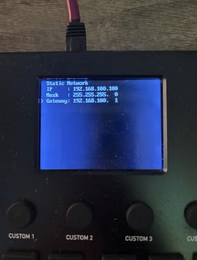
Enter the following settings when prompted:
- IP:
192.168.100.100 - Mask:
255.255.255.0 - Gateway:
192.168.100.1
- IP:
-
Press ENTER, then press ENTER again when prompted to reboot.
Once the joystick comes back up, the LCD should show 192.168.100.100 as the Local IP.
Closed Network Setup Step 3: Set a Static IP on Your Computer
Your computer needs an address on the same subnet to talk to the joystick and, later, the cameras. Use these settings:
- IP:
192.168.100.110 - Subnet:
255.255.255.0 - Gateway/Router:
192.168.100.1 - DNS:
192.168.100.1
If you need help changing this setting on your computer:
- Windows: How to configure a static IP on Windows 10 or 11
- macOS: Set a static IP in macOS Ventura and later
Once your computer's IP is set, you should be able to type 192.168.100.100 into a browser and reach the SuperJoy web interface.
Closed Network Setup Step 4: Assign Camera IP and IR Addresses
Now add the cameras to the switch and give each one its own IP and IR address. You will do this with the IR remote, so have it handy.
Work through the cameras one at a time, starting with camera 3. For each camera: plug it into the switch, wait for it to finish booting, issue the IR address command, wait for it to reboot and for the green standby light to go off, then press the matching camera select button and issue the IP address command.
Camera 3
Change IR address - [*] > [#] > [F3]       Sets IR address 3
Change IP address - [#] > [*] > [#] > [3]  Sets IP address to 192.168.100.83
Camera 2
Change IR address - [*] > [#] > [F2]       Sets IR address 2
Change IP address - [#] > [*] > [#] > [2]  Sets IP address to 192.168.100.82
Camera 1
Change IR address - [*] > [#] > [F1]       Sets IR address 1
Change IP address - [#] > [*] > [#] > [1]  Sets IP address to 192.168.100.81
Closed Network Setup Step 5: Log In to the SuperJoy and Add the Cameras
Type 192.168.100.100 into a browser on your computer. You should be prompted to set a new password, which can be up to 16 characters with no banned characters. After setting it, log in with admin as the username and your new password.
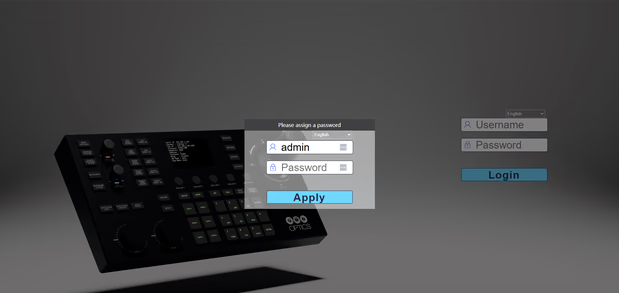
If you are not prompted to set a password, the SuperJoy is on older firmware — log in with admin as the username and leave the password blank.
Now add each camera by its static IP address:
- Click modify for channel 1 and enter
192.168.100.81. - Click modify for channel 2 and enter
192.168.100.82. - Click modify for channel 3 and enter
192.168.100.83.
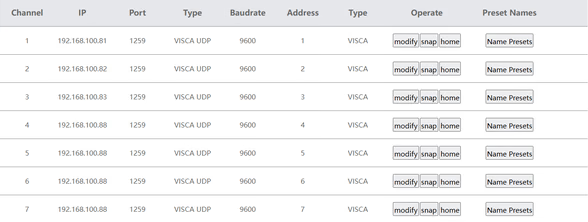
You should now be able to press CAM1 through CAM3 on the joystick and control each camera.
Continue with the shared setup steps after adding the cameras.