Pan/Tilt Limits Guide
Pan/tilt limits constrain the camera's movement to a defined area. Choose a model-specific guide for Move 4K, Link 4K, Move SE, or G2 Cameras. Shared legacy and advanced methods follow.
Choose Your Camera
Select a model-specific guide for setup and clearing instructions:
Other Ways to Manage Pan/Tilt Limits
Pan/tilt limits can also be set or cleared using a few legacy and advanced tools. These work with all of the cameras covered in this guide.
Camera Management Platform (CMP)
The Camera Management Platform (CMP) is one of a few legacy and advanced ways to set Pan/Tilt Limits on a PTZOptics camera.
You can download the Camera Management Platform here: The PTZOptics Camera Management Platform - PTZOptics
Note: Pan/tilt limits can only be set on cameras added to the CMP using a network connection; pan/tilt limits cannot be applied to USB (UVC) connected cameras. If you're unable to connect your camera to the CMP, check out this troubleshooting guide.
Note: This application is prone to bugs, so the "Done" button in the PT Limit Helper prompt may not work. This can happen regardless of operating system or camera generation. Consider using other methods.
- You can set pan tilt limits from the PTZ Control menu pictured below.
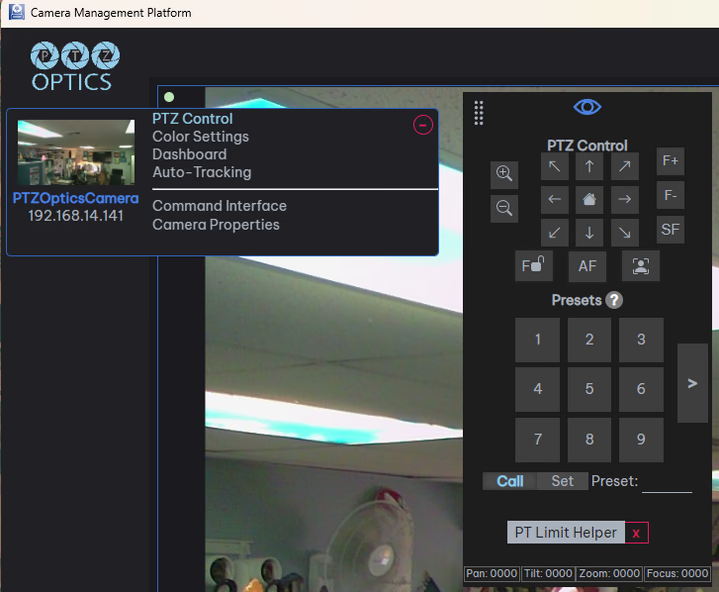
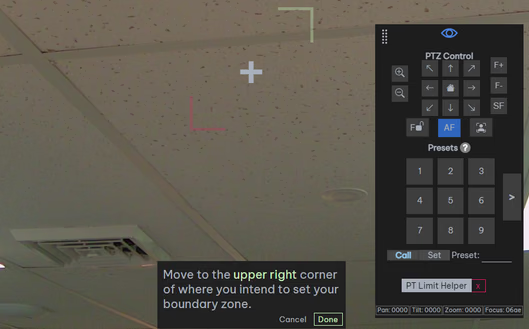
- Click on "PT Limit Helper" and follow the on-screen instructions to set pan-tilt limits.
- Move the camera through the pan/tilt range to confirm where the limits have been set. Click on the red "x" to the right of "PT Limit Helper" to clear the selected camera's pan-tilt limits.
Desktop Control App (Legacy)
The Desktop Control App is a legacy way to set Pan/Tilt Limits on a PTZOptics camera.
You can download the desktop control application here: Free Camera Control App Download for PC and MacOS - PTZOptics
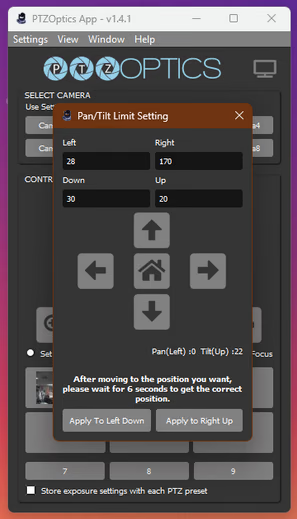
Note: It is possible to use this application to set pan/tilt limits from Settings > Pan/Tilt Limit Setting, but it will not allow you to set a right limit in the left hemisphere or a left limit in the right hemisphere, only one pan limit per hemisphere. This behavior is consistent across G3 and G2 cameras. Consider using other methods.
Packet Sender (Advanced)
Packet Sender lets you send raw VISCA commands directly to a PTZOptics camera, which is a more advanced way to set or clear Pan/Tilt Limits.
Setting Pan/Tilt Limits with Packet Sender
For VISCA transport and response guidance, see VISCA API getting started. For command bytes, see VISCA movement commands. Download and install Packet Sender from https://packetsender.com/download. You can also download this Packet Sender database which includes all of the commands used in this guide. Import the database within Packet Sender from File > Import Database.
Here are the commands we will be using to set pan/tilt limits:
| Command | Function | Command Packet | Comments |
|---|---|---|---|
| Pan_TiltLimitSet | LimitSet | 81 01 06 07 00 0W 0Y 0Y 0Y 0Y 0Z 0Z 0Z 0Z FF | W: 1 (UpRight), 0: DownLeft YYYY: Pan position, ZZZZ: Tilt position |
| * | LimitClear | 81 01 06 07 01 0W 07 0F 0F 0F 07 0F 0F 0F FF | W: 1 (UpRight), 0: DownLeft YYYY: Pan position, ZZZZ: Tilt position |
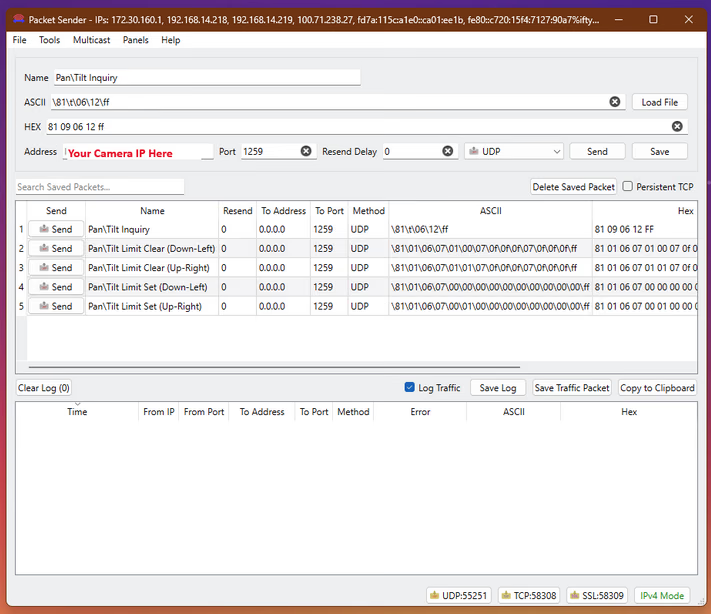
Packets should be sent to the camera's IP address using UDP on Port 1259 as pictured below. Enter your camera's IP address in the Address field.
Note: The UDP server within Packet Sender may be disabled by default. Enable it before sending commands by clicking on the UDP server button at the bottom of the interface.
-
Adjust the camera to the upper right limit of the intended boundary zone.
-
Within Packet Sender, select the Pan/Tilt Inquiry command (
81 09 06 12 ff). The HEX field will populate with the command. Click Send. This command will prompt a response from the camera that will return the camera's current pan/tilt coordinates in the log section, boxed in red below.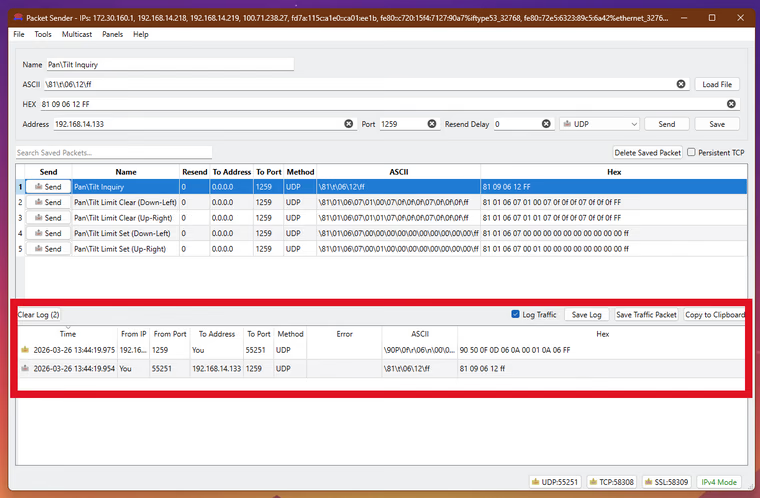 Note the green-highlighted coordinates in the example response below.
Pan Tilt Inquiry Response 90 50 00 01 07 05 00 00 0f 0a ff Coordinates -
Prepare the pan tilt limit set command (81 01 06 07 0x 01 00 00 00 00 00 00 00 00 ff). Replace the green-highlighted characters with the coordinates obtained from the inquiry response, then send the command. Below is an example of the pan tilt limit set command with
Pan Tilt Limit Set Command 81 01 06 07 00 0x 00 01 07 05 00 00 0f 0a ff Up-Right (01) or Down-Left (00) Coordinates -
Attempt to move the camera past the set upper right limits to confirm the limits are set.
-
Repeat steps 1 through 3, adjusting the camera to the lower left limit and using the Down-Left designation in the pan tilt limit set command, as pictured above.
Clearing Pan/Tilt Limits with Packet Sender
Packets should be sent to the camera's IP address using its current UDP port. The camera's default UDP port is 1259. Enter your camera's IP address in the Address field.
Note: The UDP server within Packet Sender may be disabled by default. Enable it before sending commands by clicking on the UDP server button at the bottom of the interface.
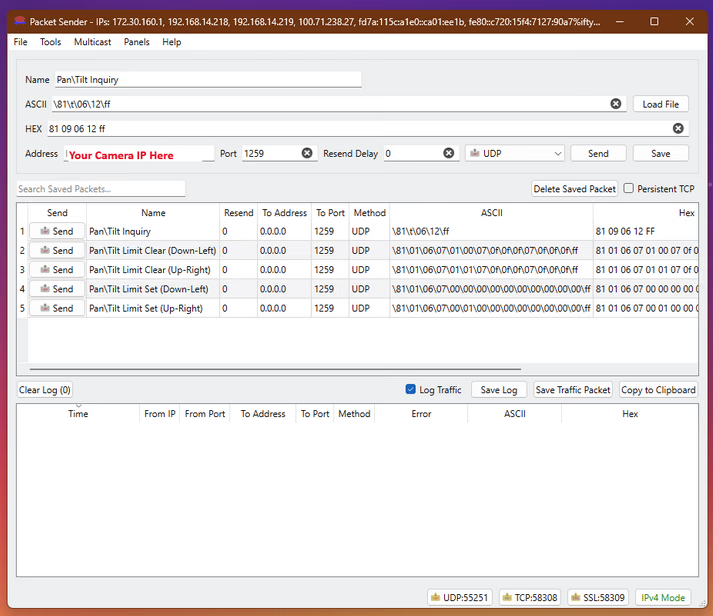
-
Using Packet Sender, send the Pan/Tilt Limit Clear commands.
- Pan/Tilt Limit Clear Command (Up-Right) (
81 01 06 07 01 01 07 0f 0f 0f 07 0f 0f 0f FF). - Pan/Tilt Limit Clear Command (Down-Left) (
81 01 06 07 01 00 07 0f 0f 0f 07 0f 0f 0f FF).
- Pan/Tilt Limit Clear Command (Up-Right) (
-
Note that the camera will not move through its pan/tilt startup dance when receiving these commands, but the limits will clear. You should also receive confirmation packets back from the camera.
- Up-Right Clear Confirmation Packets: (
90 42 ff) (90 52 ff) - Down-Left Clear Confirmation Packets: (
90 41 ff) (90 51 ff)
- Up-Right Clear Confirmation Packets: (
Pan/Tilt Limits and Target Loss
If you're using auto-tracking or auto-framing, Pan/Tilt Limits also constrain where the camera can move when it recovers from losing its tracked subject — the camera will never move outside your configured limits, even when returning to a Target Loss preset. See Configuring Target Loss to learn how the two features interact.