Automation
The Automation feature enables the camera to operate intelligently without manual PTZ input. Depending on the mode selected, the camera can track moving subjects, maintain a consistent framing, or cycle through saved presets automatically.
Enabling Automation
On the Basic View dashboard, find the Automation row beneath the Auto Focus toggle:
- Turn on the Automation toggle to enable it
- Click the gear icon to the right to open Automation Settings and configure the behavior
Automation Settings Tab
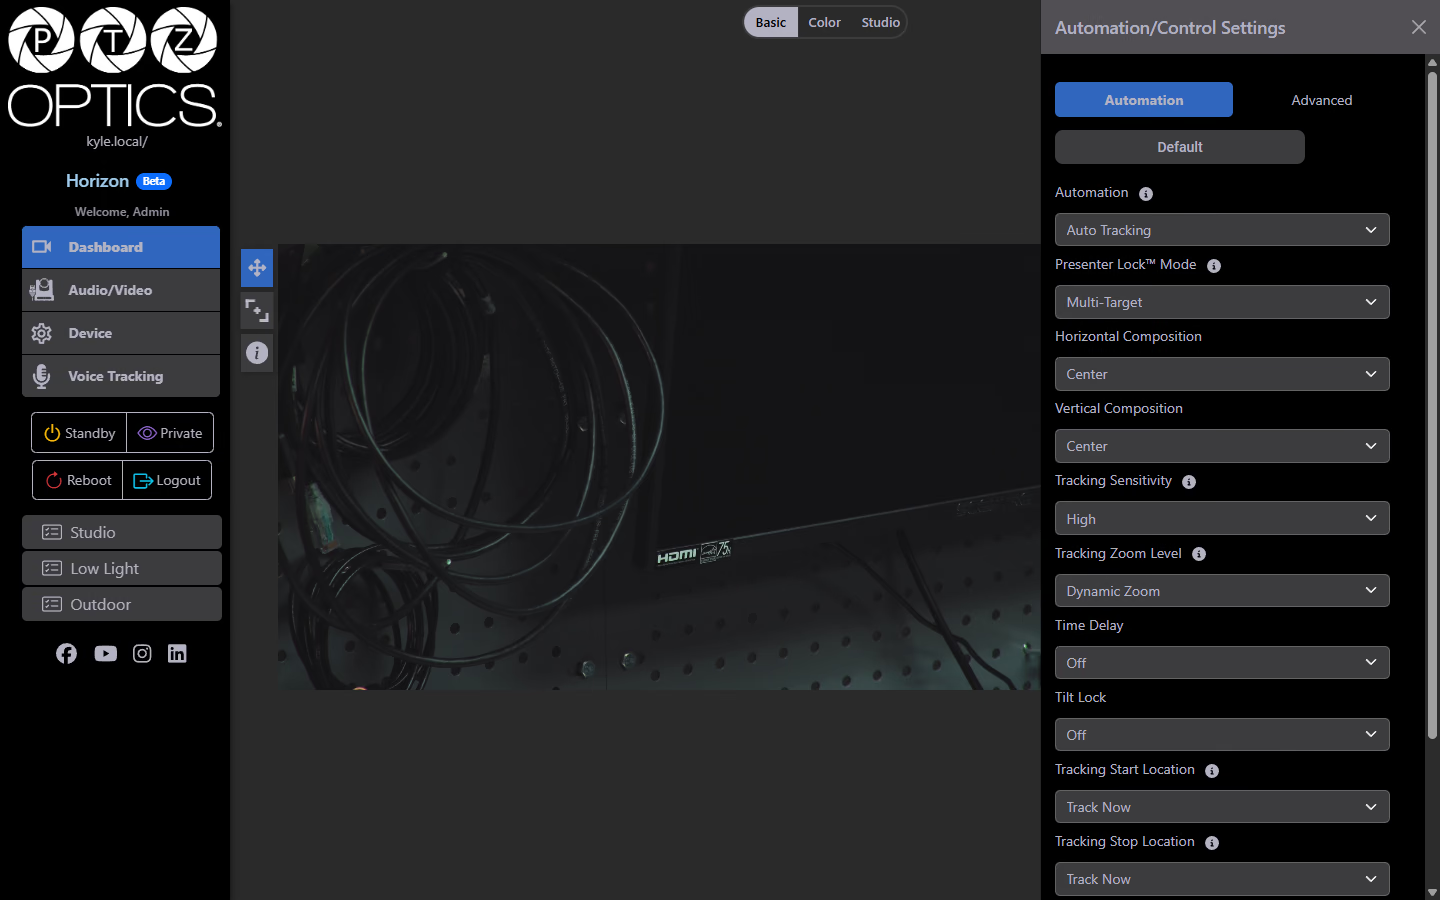
Automation Mode
Selects the primary behavior when Automation is active.
| Option | Description |
|---|---|
| Auto Tracking | The camera detects and follows a subject as they move within the frame. Ideal for solo presenters, instructors, or performers who move around. |
| Auto Framing | The camera automatically adjusts framing to keep one or more people well-composed in the shot, without locking onto a single subject. Ideal for group shots or conference rooms. |
| Preset Tour | The camera cycles through a defined sequence of saved presets on a timer, returning to each position automatically. |
Presenter Lock™ Mode
Controls whether a visual indicator is drawn around tracked subjects and how the camera selects which subject to track.
| Option | Description |
|---|---|
| Off | No visual overlay (default, recommended for production). |
| Select Target | When enabled, displays a bounding box around the currently selected tracking target. This bounding box will be shown on the camera's live feed. |
| Multi-Target | Shows bounding boxes around all detected subjects allowing the user to choose which target to track. These bounding boxes are not shown on the live video feed. They are only shown in Horizon. |
| Debug | Displays full tracking debug data and all detection overlays. |
Horizontal Composition
Sets where in the frame the tracked subject is positioned horizontally.
| Option | Description |
|---|---|
| Left | Subject is framed toward the left side of the shot. |
| Center | Subject is centered horizontally in the frame. |
| Right | Subject is framed toward the right side of the shot. |
Vertical Composition
Sets where in the frame the tracked subject is positioned vertically.
| Option | Description |
|---|---|
| Top | Subject is framed toward the upper portion of the shot. |
| Center | Subject is centered vertically in the frame. |
| Bottom | Subject is framed toward the lower portion of the shot. |
Tracking Sensitivity
Controls how responsively the camera reacts to subject movement.
| Option | Description |
|---|---|
| Low | Camera moves slowly and only responds to significant, sustained movement. Reduces jitter in busy scenes. |
| Medium | Balanced tracking response — good default for most applications |
| High | Camera responds quickly to any detected movement. Best for fast-moving subjects like dancers or athletes. |
Tracking Zoom Level
Sets how tightly the camera frames the subject when tracking.
| Option | Description |
|---|---|
| Dynamic Zoom | Camera automatically adjusts zoom level based on subject distance and movement. |
| Medium Close Up | Maintains a tight head-and-shoulders frame. |
| Medium Shot | Waist-up framing. |
| Long Shot | Full-body framing — subject visible head to toe (default). |
Time Delay
| Option | Description |
|---|---|
| Off | Camera begins tracking immediately when a subject is detected (default). |
| On | Camera waits a brief period before initiating tracking movement, reducing false triggers from brief motion. |
Tilt Lock
| Option | Description |
|---|---|
| Off | Camera moves freely on both pan and tilt axes during tracking |
| On | Camera tilt is locked in place. The Camera will only use pan movements to follow the subject. Useful for fixed-height setups where vertical drift is undesirable. |
Tracking Start Location
Defines where the camera moves to before beginning to track.
| Option | Description |
|---|---|
| Track Now | Camera begins tracking from its current position immediately (default). |
| Home | Camera moves to the home position first, then begins tracking. |
| Preset 0–254 | Camera recalls the specified preset position before tracking begins. |
Tracking Stop Location
Defines where the camera moves to when Automation is disabled or the subject is lost.
| Option | Description |
|---|---|
| Track Now | Camera stays at its last tracked position (default). |
| Home | Camera returns to the home position. |
| Preset 0–254 | Camera recalls the specified preset. |
Target Timeout
A numeric spinbutton (default: 6). Sets how many seconds the camera waits after losing a subject before taking the "Target Loss" action. This prevents the camera from immediately snapping away due to a brief occlusion.
Target Loss Preset
Defines what the camera does after the Target Timeout expires without re-acquiring the subject.
| Option | Description |
|---|---|
| Track Now | Camera stays in its current position and continues scanning. |
| Home | Camera returns to the home position (default). |
| Preset 0–254 | Camera recalls the specified preset. |
Advanced Settings Tab
The Advanced Settings tab contains settings that affect how the camera moves and displays information during automation.
Preset Freeze
| Option | Description |
|---|---|
| Off | Camera output updates continuously during preset recall movements (default). |
| On | Camera freezes the output frame during preset transition movements, then cuts to the new position |
Zoom Mode
Sets which zoom technology is used during tracking.
| Option | Description |
|---|---|
| Optical | Uses the camera's optical zoom only. No quality loss (default). |
| Digital 2× | Extends range with 2× digital zoom. Some image quality reduction expected. |
| Digital 4× | Extends range with 4× digital zoom. Some image quality reduction expected. |
| Digital 8× | Extends range with 8× digital zoom. Some image quality reduction expected. |
| Digital 16× | Maximum digital reach (some image quality reduction expected). |
| SuperZoom | Doubles the total zoom range of the camera by applying a 2× digital magnification to the 4K sensor before entering the optical zoom providing a smoother zoom transition. With the magnification effectively doubled while using SuperZoom, the camera's image resolution is set to 1080p. |
Motion Sync
| Option | Description |
|---|---|
| Off | Pan and zoom movements execute independently at their own speeds. |
| On | Pan/tilt and zoom movements are synchronized to arrive at the target position simultaneously, producing smoother, more broadcast-quality tracking (default). |
Display Info
| Option | Description |
|---|---|
| Off | No on-screen overlay during automation. |
| On | Displays tracking status and subject information as an on-screen overlay (default). |
Tally Mode
| Option | Description |
|---|---|
| Off | Tally light on the camera front is inactive. |
| On | Tally light activates when the camera is being tracked/selected. This is useful in multi-camera production environments to indicate the active camera (default). |
The Automation page provides full control over the SimplTrack3's auto-tracking system. It includes a dual video preview (PTZ and Reference cameras), tracking controls, behavior settings, zone management, and zone-based action triggers.
The page is organized into three tabs: Control, Settings, and Actions.
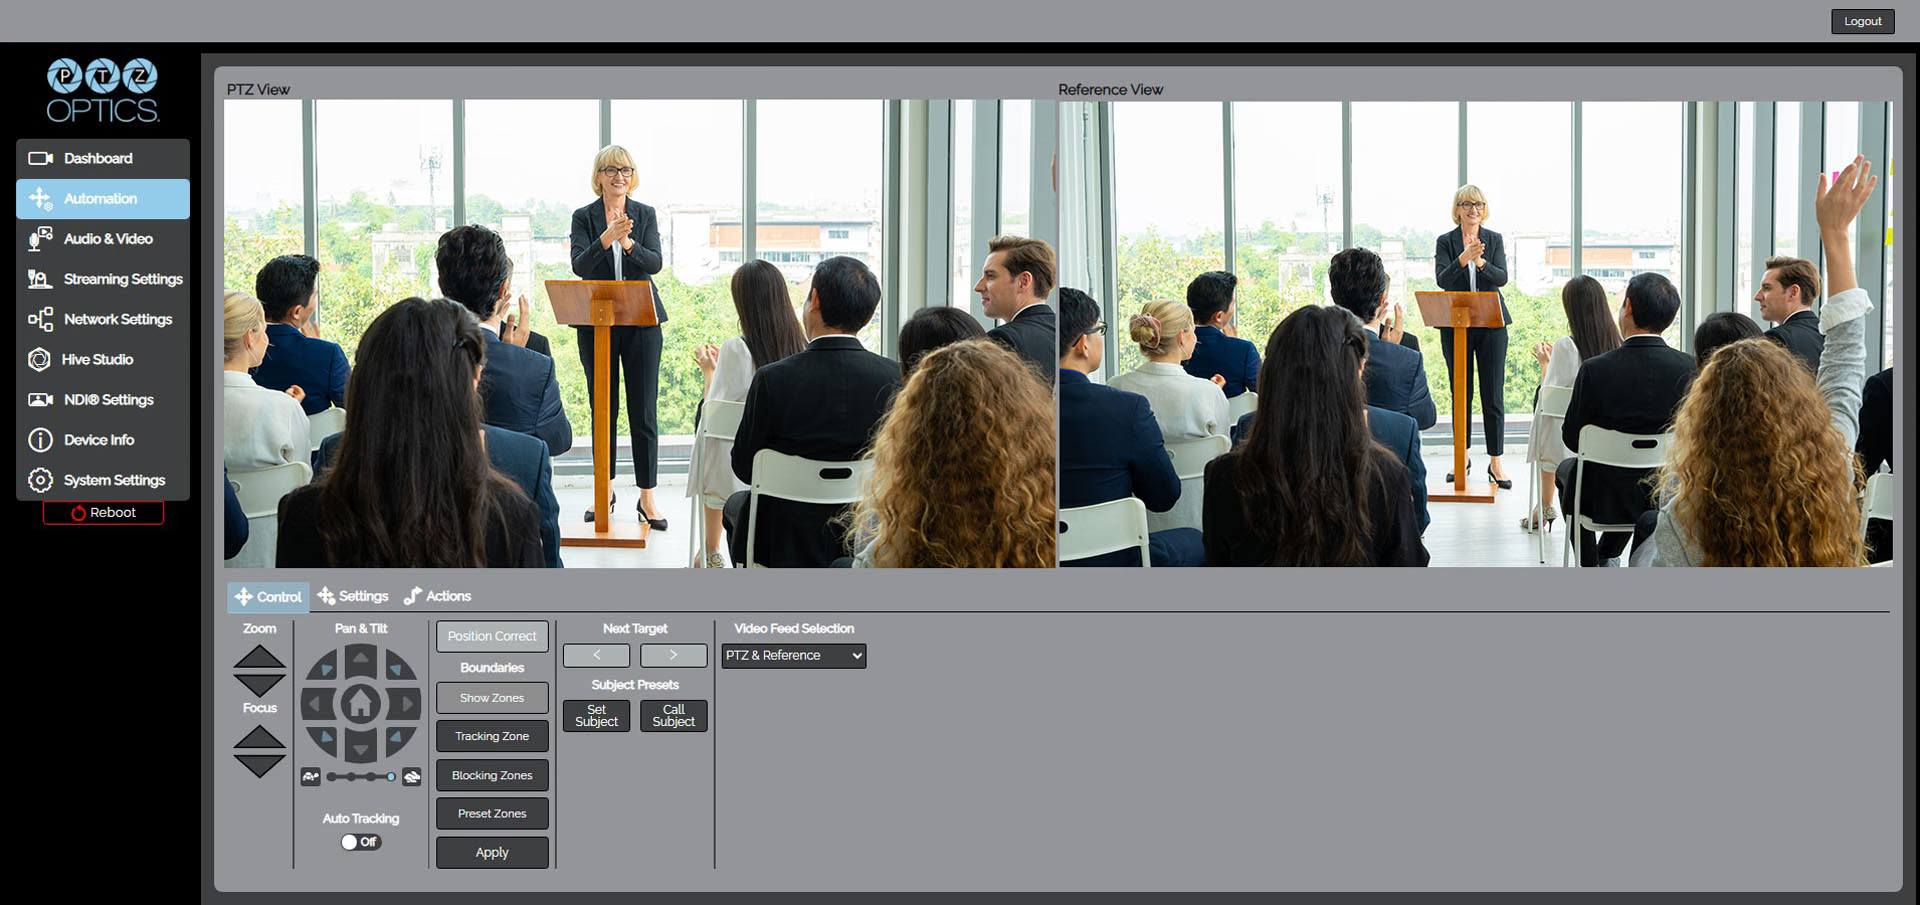
Dual Video Preview
The top of the Automation page displays two side-by-side video feeds:
| Feed | Description |
|---|---|
| PTZ View | The output of the camera's PTZ lens. |
| Reference View | The output of the wide-angle reference camera: A fixed overview of the scene used for subject detection and for users to create tracking/blocking zones via clicking and dragging inside the reference view. |
A Video Feed Selection dropdown at the bottom of the control panel allows you to change the layout:
| Option | Description |
|---|---|
| PTZ & Reference | Shows both feeds side by side (default). |
| PTZ | Shows only the PTZ camera feed. |
| Reference | Shows only the Reference camera feed. |
Control Tab
The Control tab provides direct control over the camera's movements and tracking behavior, with the same PTZ control buttons and speed settings as the Dashboard, plus additional controls specific to auto-tracking and zone management.
Auto Tracking Toggle
The Auto Tracking switch enables or disables AI-driven auto-tracking:
- Off: (default) Standard manual PTZ operation
- On: The PTZ lens automatically follows subjects detected by the reference lens.
Boundaries
Zone controls allow you to define where tracking is active and configure blocking or preset trigger zones assigned within the reference lens view.
| Button | Description |
|---|---|
| Position Correct | Recalibrates the alignment between the PTZ and Reference cameras. Disabled when Show Zones is selected. Use the Directional arrows and zoom controls to fine-tune the alignment between the two camera feeds. |
| Show Zones | Toggles the visibility of all configured zones on the reference lens view. |
| Tracking Zone | Defines the active area within the reference lens view where the camera will track subjects. |
| Blocking Zones | Defines areas where the camera will not identify subjects for tracking, though subjects identified outside these zones can be tracked through them; useful for excluding doorways, windows, or high-traffic areas. You can assign up to 8 blocking zones. |
| Preset Zones | Defines zones that trigger a preset recall when a subject enters them. You can assign up to 8 preset zones. |
| Apply | Saves the current zone configuration. |
Next Target
When multiple subjects are detected, the Next Target left/right buttons cycle the camera's tracking focus between detected subjects. These buttons are disabled when Auto Tracking is off.
Automation Presets
Quick-access buttons for two special presets used by the automation system:
| Control | Description |
|---|---|
| Subject Preset (Set) | Saves the current camera position as the Subject preset. |
| Subject Preset (Call) | Recalls the saved Subject preset; typically a tighter shot framing. Could be used to focus on a subject near a whiteboard or other point of interest. |
Settings Tab
The Settings tab controls how the auto-tracking behaves. After making changes, click Apply to save.
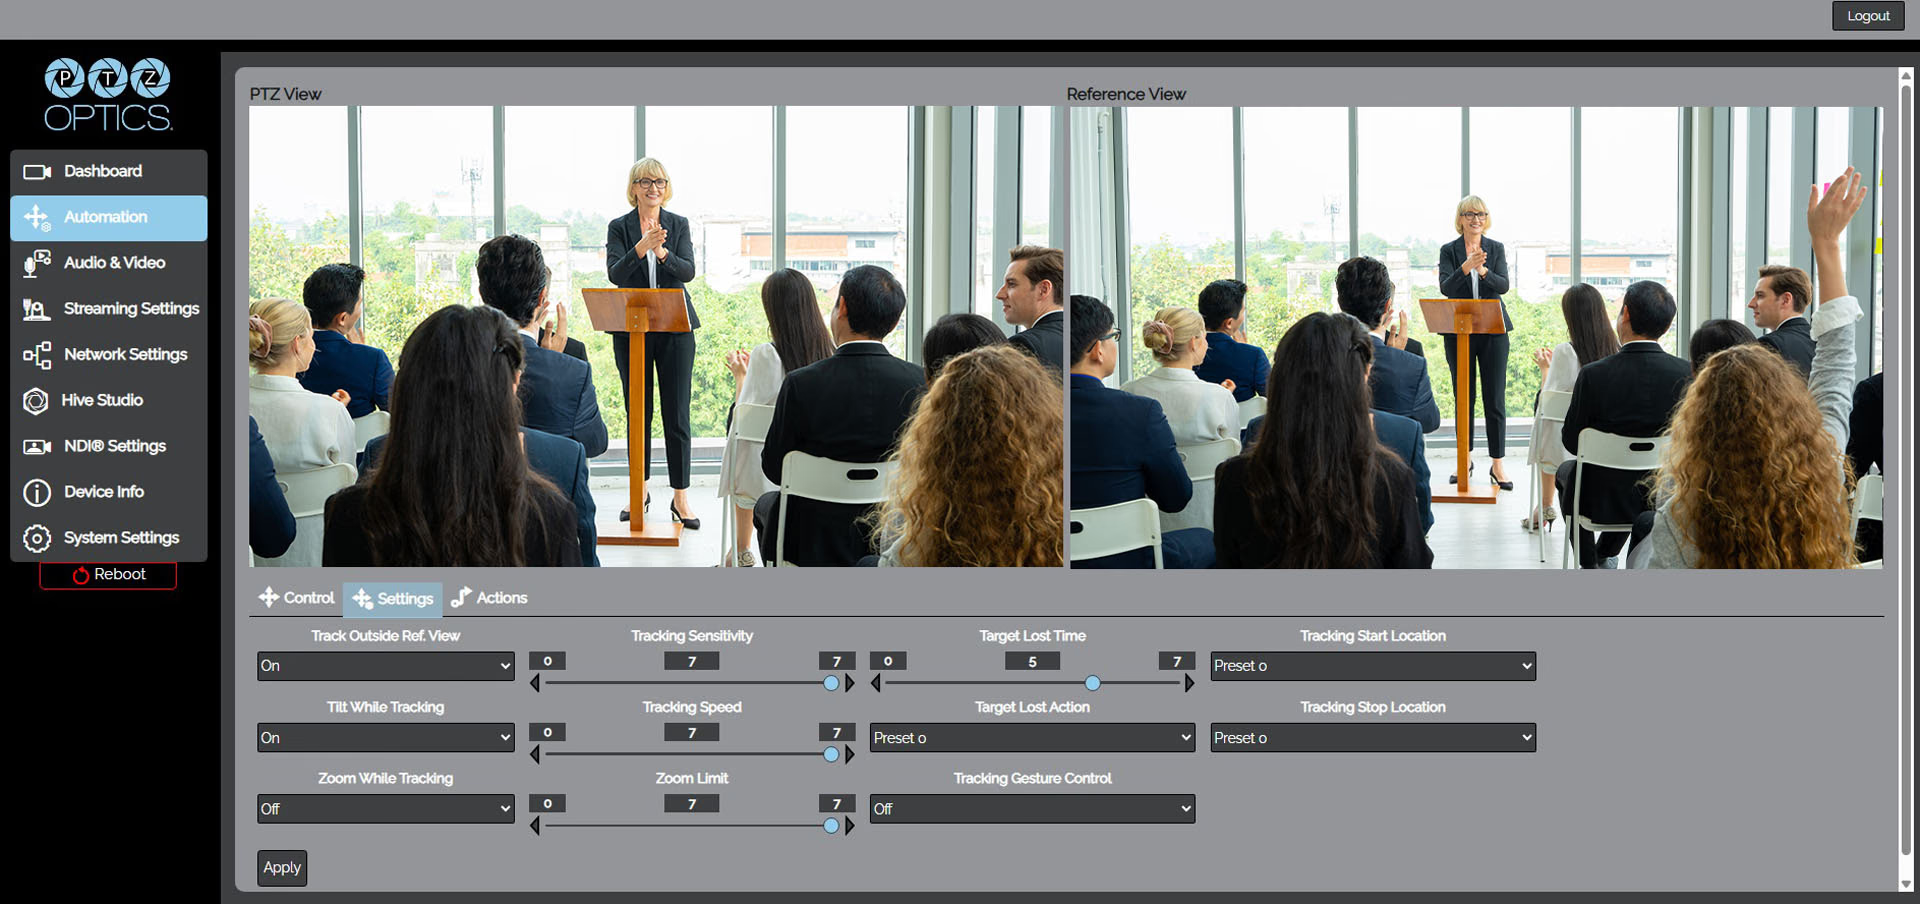
| Setting | Range / Options | Default | Description |
|---|---|---|---|
| Track Outside Ref. View | Off / On | On | When enabled, the PTZ camera continues tracking a subject even if they move outside the reference lens's field of view. |
| Tracking Sensitivity | 0–7 | 7 | Controls how readily the camera begins tracking a new subject. Higher values make tracking more responsive. |
| Target Lost Time | 0–7 | 5 | How long (in relative units) the camera waits after losing a subject before executing the Target Lost Action. |
| Tilt While Tracking | Off / On | On | When enabled, the camera adjusts tilt (vertical position) while tracking a subject. Disable for horizontal-only tracking. |
| Tracking Start Location | Presets 0-9, Home, Stay In Place | Preset 0 | Determines the initial position the camera moves to when starting to track a subject. |
| Tracking Speed | 0–7 | 7 | Controls how quickly the PTZ camera moves to follow a tracked subject. Higher values produce faster, more aggressive tracking. |
| Target Lost Action | Presets 0-9, Stay In Place, Home | Preset 0 | Determines what the camera does when a tracked subject is lost. |
| Target Stop Location | Presets 0-9, Stay In Place, Home | Preset 0 | Determines the position the camera moves to when tracking stops. |
| Zoom While Tracking | Off / On | On | When enabled, the camera automatically adjusts zoom to maintain a consistent framing of the tracked subject. |
| Zoom Limit | 0–7 | 7 | Sets the composition of the subject within the frame when Zoom While Tracking is enabled. |
| Tracking Gesture Control | Off / On | Off | When enabled, the camera recognizes specific gestures from subjects to switch tracking who the camera is following. |
Zoom Limit Values
The following is a list of Zoom Limit value ranges and their generally intended uses for Zoom While Tracking:
- 0–2: Close-up view
- 3–5: Half-body view
- 6–7: Whole-body view
Value 4 is recommended for typical use cases.
Actions Tab
The Actions tab configures zone-based triggers. When a tracked subject enters or exits a defined Preset Zone, the camera can send a network command to an external system (e.g., a video switcher, lighting controller, or automation server).
Actions are configured per zone. Select the target zone from the dropdown at the top of the tab:
- Zone 1 through Zone 8
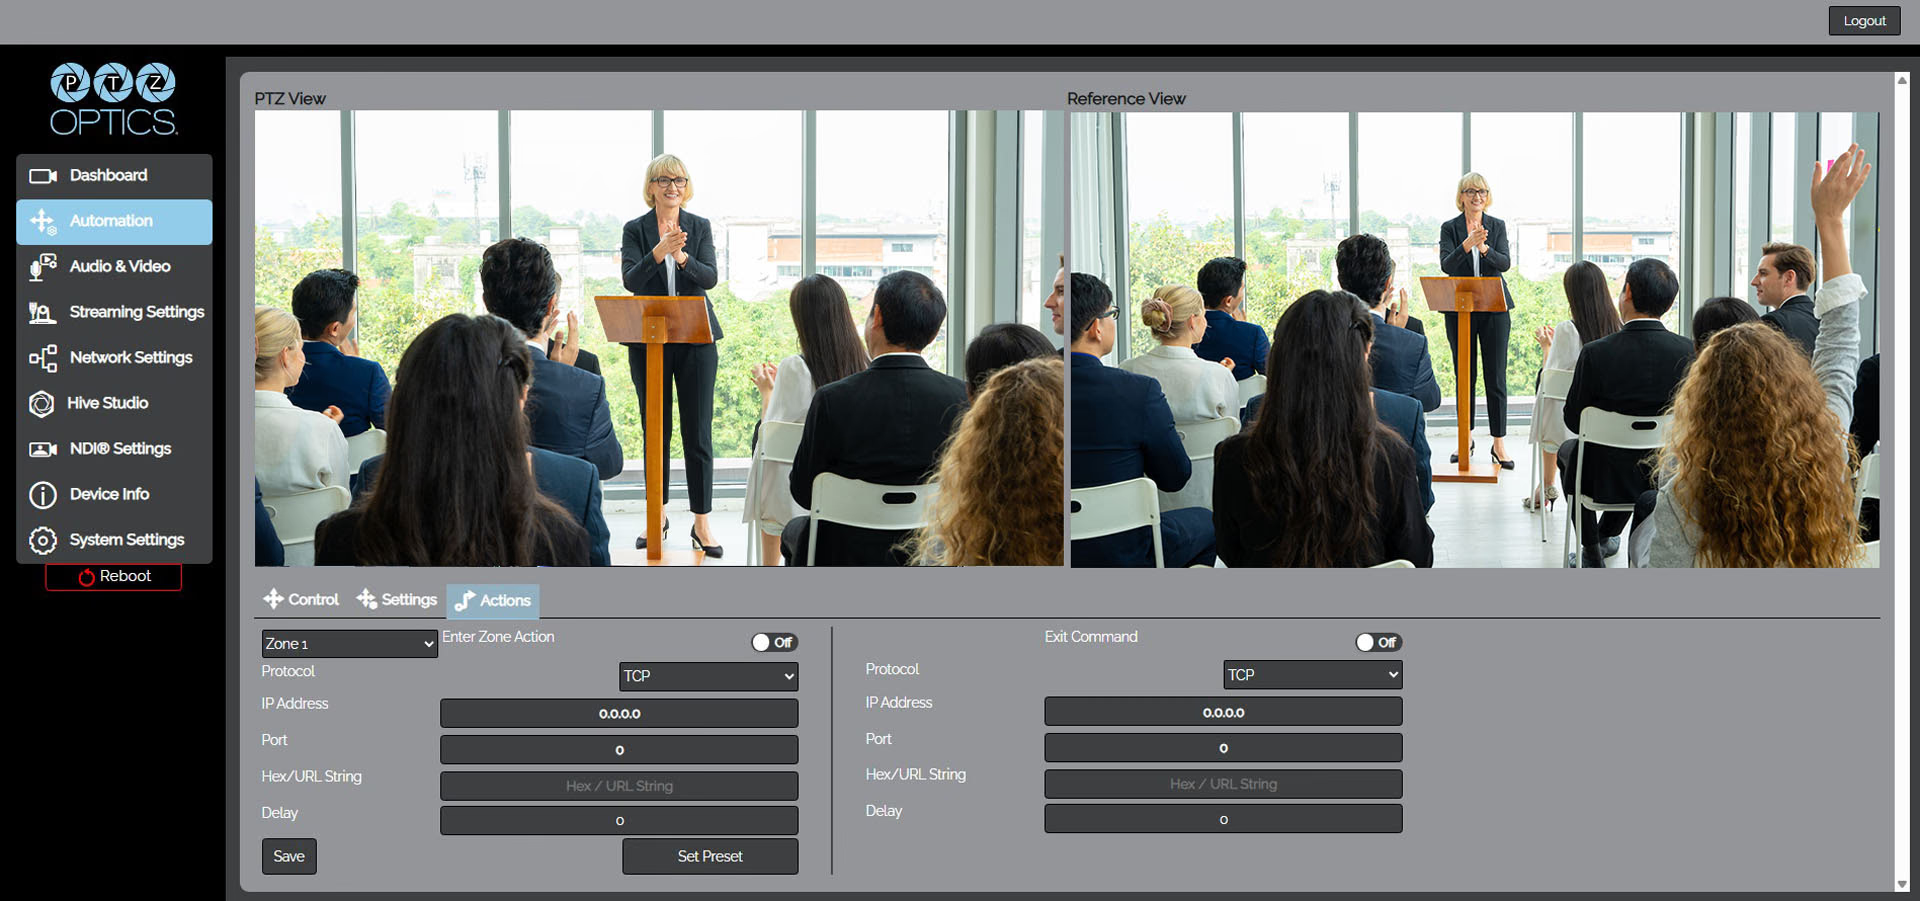
Enter Zone Action
Triggered when a subject enters the selected zone.
| Setting | Options | Description |
|---|---|---|
| Enter Zone Action | Off / On | Enables or disables the enter-zone trigger |
| Protocol | TCP, UDP, HTTP GET, HTTP POST | The network protocol used to send the command |
| IP Address | IP address | The destination IP address for the command |
| Port | Port number | The destination port |
| Hex/URL String | Text | The command payload — a hex string (for TCP/UDP) or a URL path (for HTTP) |
| Delay | Seconds | Time in seconds to wait before sending the command after the zone is entered. |
| Save | Button | Saves the enter-zone action configuration. |
| Set Preset | Button | Associates a camera preset with this zone entry. |
Clicking Set Preset opens the PTZ, zoom, and focus controls so the user can move the camera to the desired position for that zone. After positioning the camera, clicking Set Preset saves that location specifically to the zone entry. This saved position is independent from the normal presets on the main dashboard, so it does not overwrite or use the standard camera preset list.
Exit Zone Action
Triggered when a subject exits the selected zone.
| Setting | Options | Description |
|---|---|---|
| Exit Zone Action | Off / On | Enables or disables the exit-zone trigger. |
| Protocol | TCP, UDP, HTTP GET, HTTP POST | The network protocol used to send the command. |
| IP Address | IP address | The destination IP address for the command. |
| Port | Port number | The destination port. |
| Hex/URL String | Text | The command payload; a hex string (for TCP/UDP) or a URL path (for HTTP). |
| Delay | Seconds | Time in seconds to wait before sending the command after the zone is exited. |
Zone-based actions are a powerful tool for integrating automation into your production workflow. For example, you can configure a zone at a podium that sends a command to switch to a close-up camera input whenever a speaker steps up to the lectern.
Auto-Framing
Auto-Framing dynamically adjusts the camera's zoom and framing to keep subjects optimally composed within the shot.
To switch between auto-tracking and auto-framing modes, use the toggle button at the top of the System Settings page.
Toggling this switch will reboot the camera to apply the changes.
To learn more about the System Settings, refer to System Settings
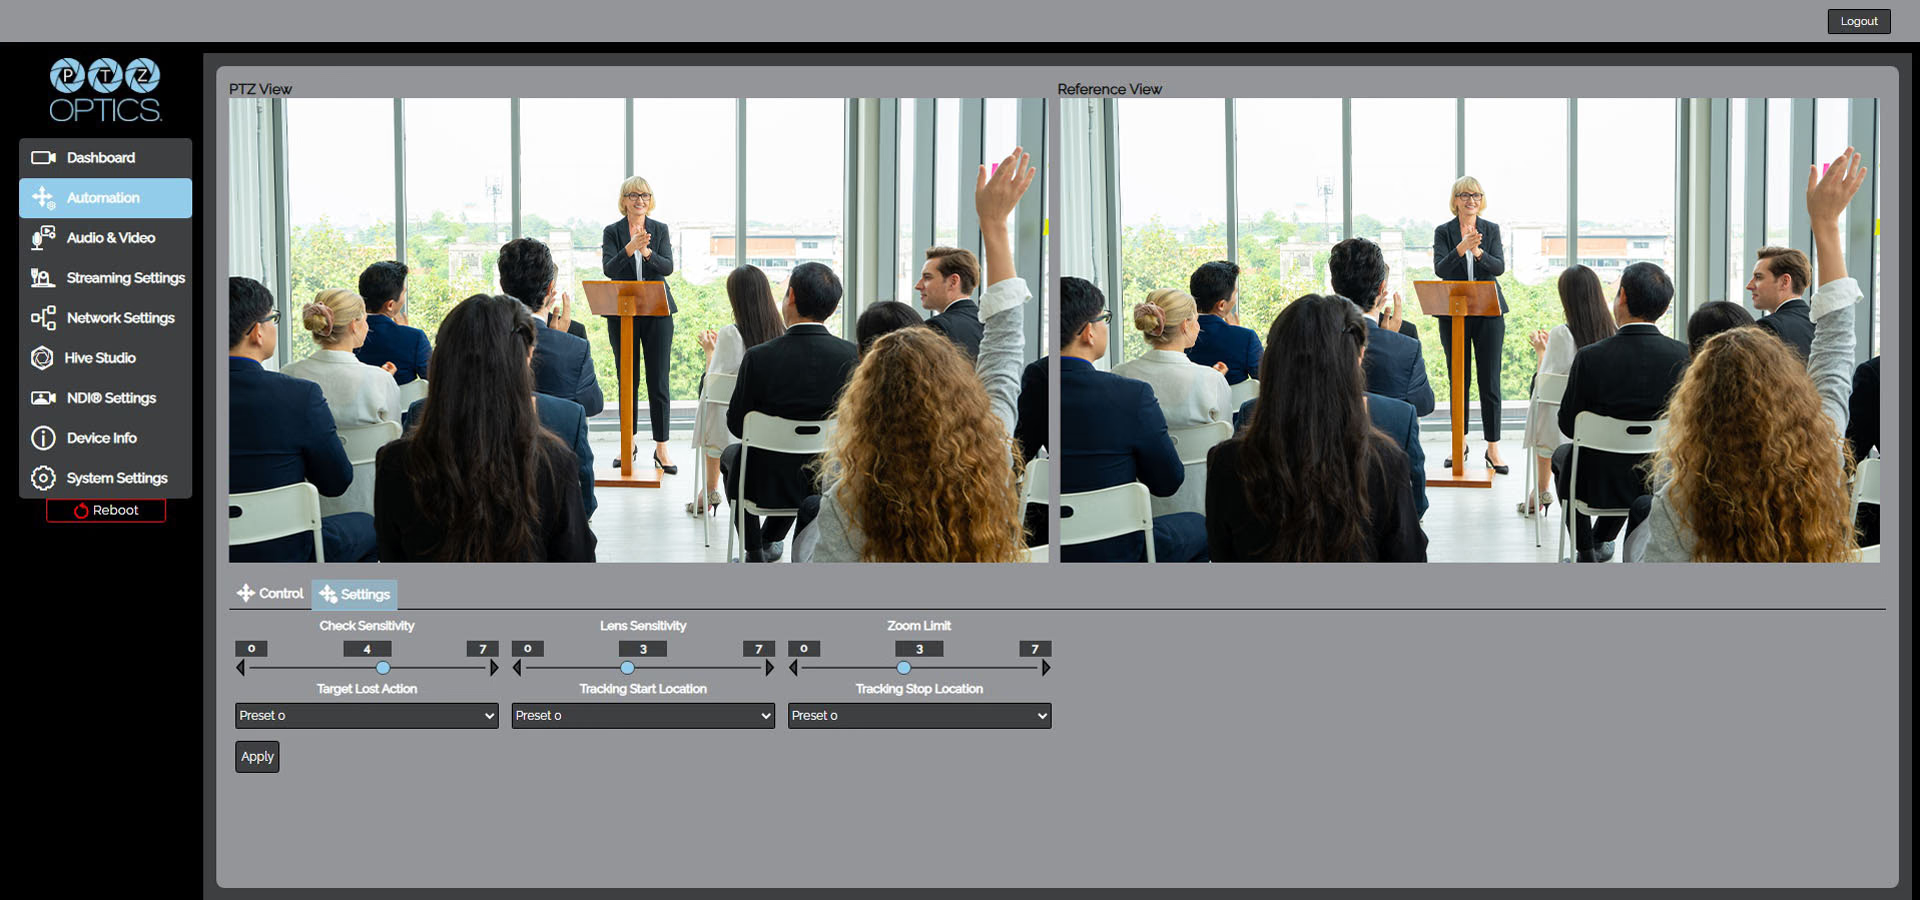
Auto-framing does not require you to set a tracking zone, but instead uses the entirety of the camera's reference lens view. Blocking zones are the only type of zones that can be used while in auto-framing mode to restrict the area the camera will consider for framing.
Auto-Framing Control
The Auto-Framing Control tab provides direct control over the camera's movements and framing behavior. You can manually adjust the camera's pan, tilt, and zoom, enable or disable auto-framing, and set blocking zones to restrict the areas the camera will consider for framing.
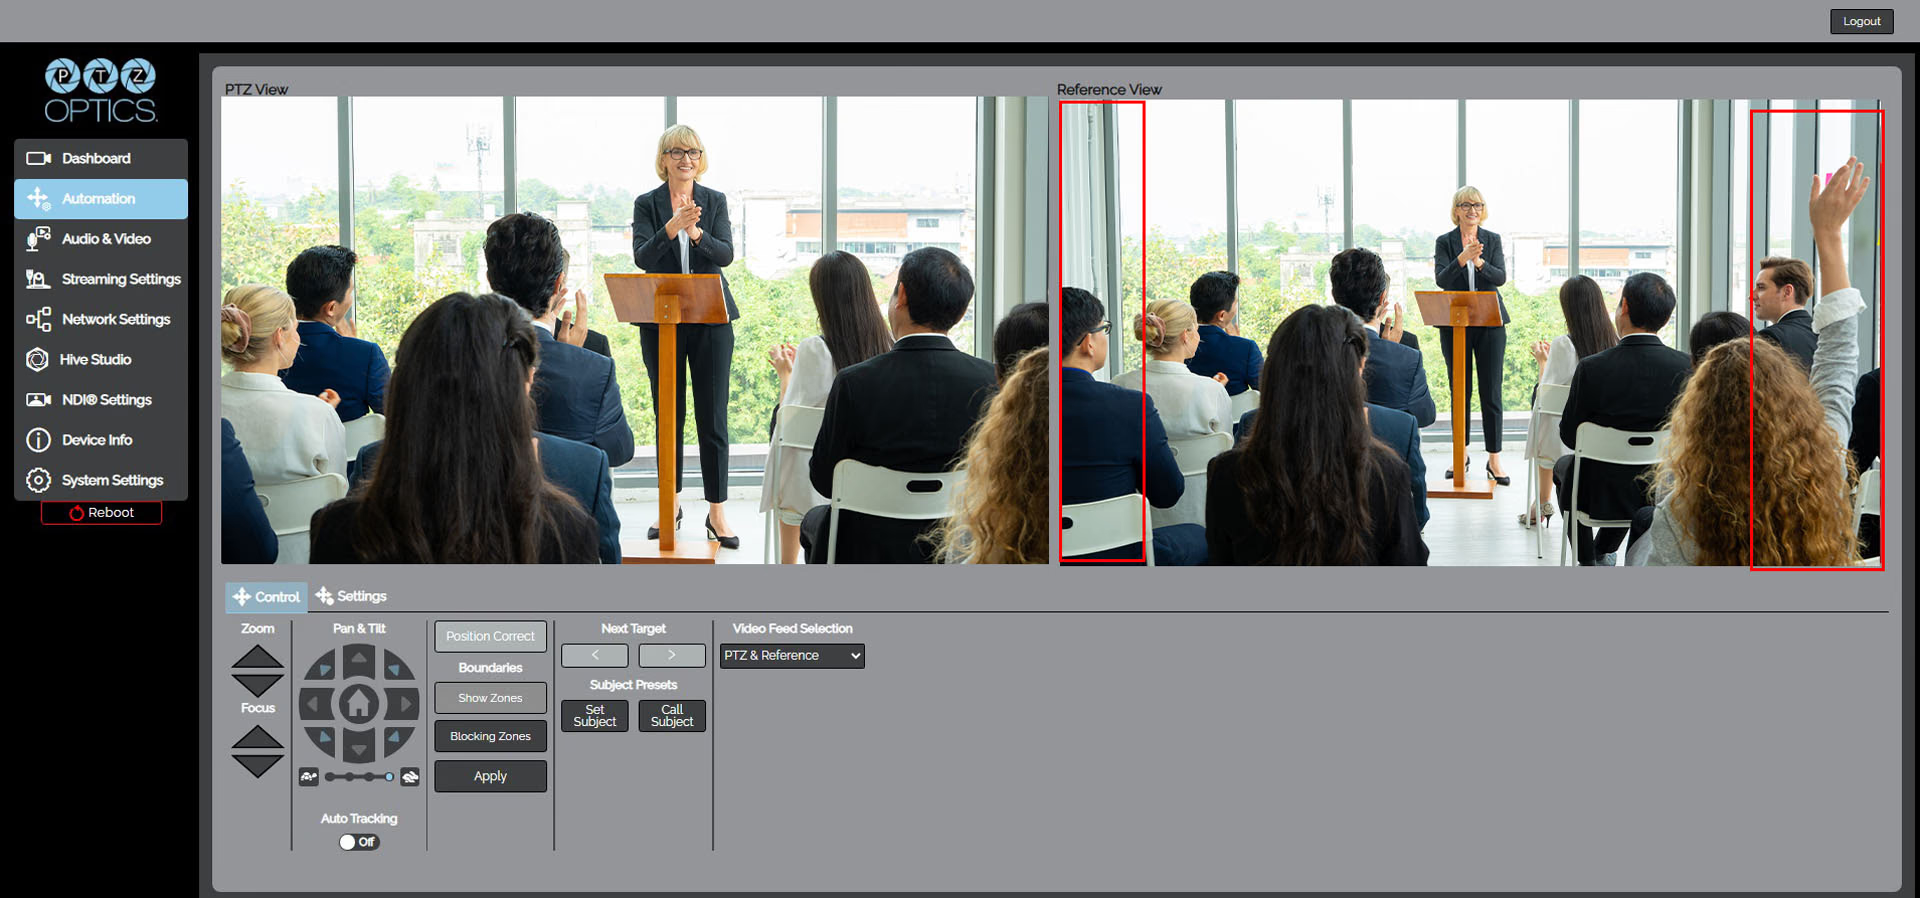
Auto-Framing Settings
| Setting | Range / Options | Default | Description |
|---|---|---|---|
| Check Sensitivity | 0–7 | 7 | Controls how sensitive the auto-framing system is to subject movement. Higher values make it more responsive to changes in subject position. |
| Lens Sensitivity | 0–7 | 7 | Controls how aggressively the camera adjusts zoom and framing. Higher values produce faster, more dynamic adjustments. |
| Zoom Limit | 0–7 | 3 | Sets the maximum zoom level the camera can reach when auto-framing is active. |
Target Lost Action: Determines what the camera does when it loses track of a subject while auto-framing. Options include returning to Preset 0, Preset 1, or staying in place.
Target Start Location: Determines the initial position of the camera when auto-framing begins. Options include Preset 0, Preset 1, or the current camera position.
Target Stop Location: Determines the final position of the camera when auto-framing ends. Options include Preset 0, Preset 1, or the current camera position.